//ArrowChat Code
Results 1 to 7 of 7

Thread: HOW TO: Set timing on Honda 185/200 motors with pics

  1. #1
    Join Date
    Sep 2007
    Location
    100mi west of Chicago
    --
    3,582

    HOW TO: Set timing on Honda 185/200 motors with pics

    This procedure should apply to all 185 and 200 Honda trikes besides the 86-87 200x

    I see questions come up about this every so often so I figured since I was going to be doing it I would document the process.

    The first step that I don’t even have pictured here is to get your piston to TDC. If you don’t have the cam installed yet the exhaust and compression stoke hasn’t been determined so just have the T on the flywheel showing through the viewing hole. I usually remove the spark plug and look in the hole with a flashlight to verify the piston is at the top of its stroke.

    If you do have the cam installed then to make sure you are on the compression stroke of TDC you still want to have the T showing, but you also want both rocker arms to be loose. This means if you remove the valve access caps on the head cover you can move the arms just a tiny bit.

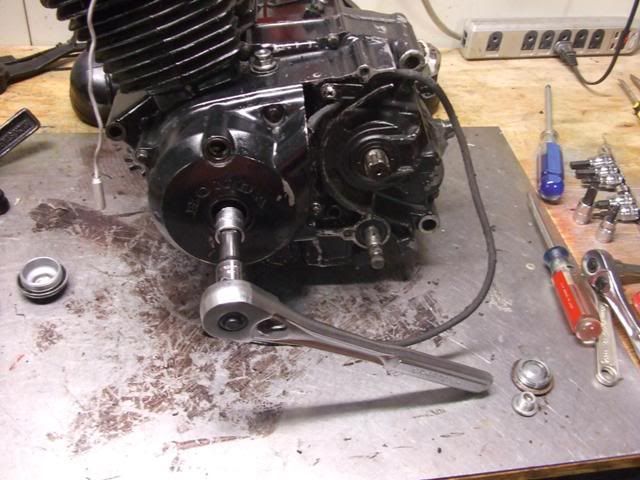
    Ok so now we have the piston at TDC. To make sure it stays there through the procedure, I always use my ½ ratchet on the end of the crank and put the handle resting against my work bench. If you don’t do this the piston tends to want to move back down in the cylinder.


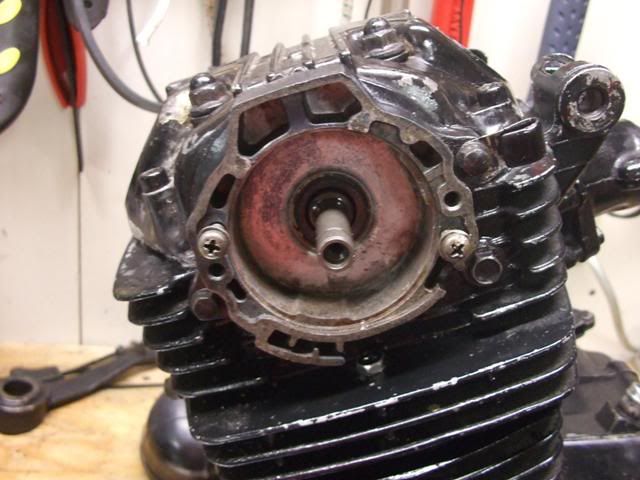
    Whether you are just now installing the cam or already have it installed, it will have the lobes pointing down at this point and the little dowel pin should be pointing to about 11 o’clock. Now you are ready to install the cam chain onto the cam gear, and the gear onto the cam. Install the gear onto the cam with the little o pointing to 12 o’clock. At first you might get off a tooth or 2 and have to try again. Keep at it until you get the o pointing to 12.


    Next install the pulse generator base. The only thing to watch out for here is to not mess up the oil seal when slipping it over the little pin.


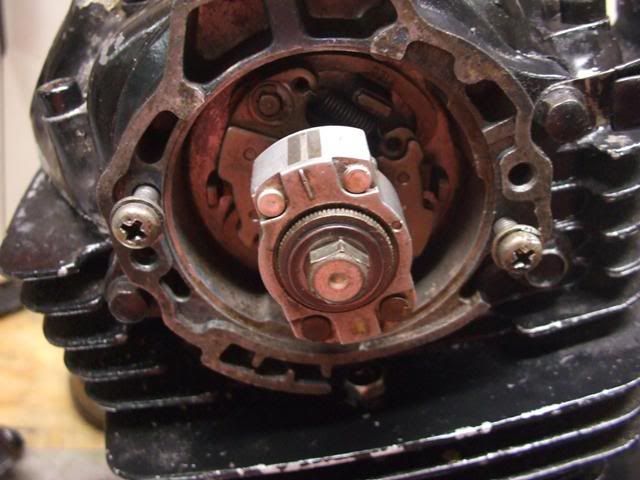
    Now you are ready to install the pulse rotor. The little slot on the backside of the rotor will fit over the dowel pin on the cam. This is the only way it can install so it’s hard to mess up. It will point slightly to the left of 12 o’clock when installed.


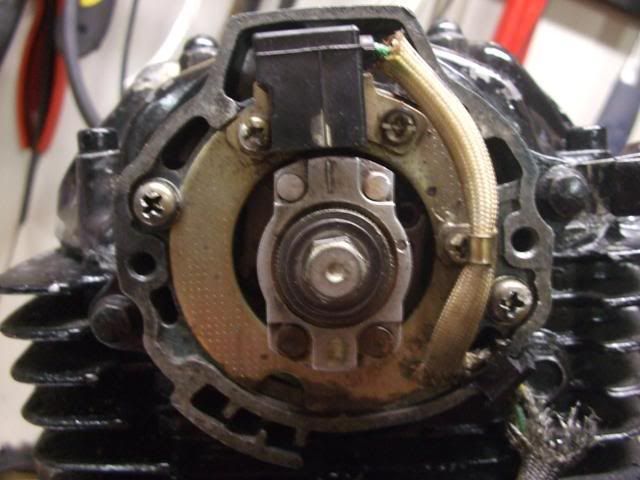
    Finally it’s time to install the base plate. Before doing this you want to turn the crank so you get the F on the flywheel showing through the viewing hole. The F is about ½ inch to the left of the T on the flywheel. Do the same thing with the ratchet against the bench to make sure the piston doesn’t move again. Align the vertical line on the little black plastic box on the base plate with the vertical line on the rotor. They should both be pointing at about 12 o’clock. Tighten the screws.


    That’s really all there is to it. If you had the cam out you will want to adjust your valves, and you will want to adjust the cam chain if you slackened it to install the cam gear.

    Any questions or corrections, please post them up.

    Rob

  2. #2
    Nubbinz is offline At The Back Of The Pack Arm chair racerFirst time rider
    Join Date
    Apr 2011
    Location
    Winchester, VA
    --
    171
    Question : If the base plate is installed when the F is not visible, will the trike not spark, and as a result not run? I pulled the head cover on mine because it was leaking oil, shot honda bond around it and when i get it back together it wont spark. My 185s has been sitting at the edge of my woods getting rusty since summer . I Would like to get it running as Ive ridden some massive 4 wheelers but none were as fun as the little trike.

  3. #3
    Join Date
    Apr 2009
    Location
    Oklahoma
    --
    1,234
    Thank you for the how to!

  4. #4
    Join Date
    Jun 2009
    Location
    Tunkhannock,Pa
    --
    904
    great walk through this should definitely have a sticky in the world class help thead
    1985 200X
    66mm H&S Piston
    Little Bit Bigger Cam
    Bassani Exhaust

    1985 350X With Bassani Exhaust

    1983 Honda 200E (PARTING OUT!!!!)

    1985 Yamaha Tri-Zinger


    My Feedback Threadhttp://http://www.3wheelerworld.com/showthread.php?105185-Feedback-for-RodKnockRacing&highlight=RodKnockRacing

  5. #5
    Scootertrash's Avatar
    Scootertrash is offline Just Too Addicted: Protecting Our Community The day begins with 3WW
    Join Date
    Apr 2011
    Location
    In the sticks
    --
    4,628
    Great Post!!
    Quote Originally Posted by fabiodriven View Post
    Trick the people into thinking they're enacting their own will and you have willing slaves.

    Liberalism suspends the intellect of its victims, while at the same time tricking them into believing that they're smarter than everyone else.


    If we've done business together, please leave me feedback. Thank You!:

    http://www.3wheelerworld.com/showthr...t=Scootertrash

  6. #6
    Join Date
    Feb 2011
    Location
    Sarnia, Ontario, Canada
    --
    3,415
    Just to add to this:

    For the pull-start engine I removed the pull start. Then rotated the flywheel by hand to exactly the correct position off TDC(the F & T marks). Then I locked the crank in place with a plastic screw driver handle jammed between the flywheel and inside of the case. 1st to set the cam-chain, then moved it to the 2nd mark and did the same to set the baseplate/pickup position.

    Since this gave me the ability to get it spot on considering that even a tiny bit of crank rotation will throw you off..
    Current toys..
    1986 Honda 350X..trail bomb!
    1985 Honda 250SX..my main mudder
    1985 Honda 250ES..Back in Black Trike
    Current non-trike toys:
    1990 Honda TRX300FW
    1995 Seadoo GTX
    1998 Polaris Indy Lite 340(Nearly new looking)
    1998 Polaris Touring 500
    1998 Club Car (electric)

  7. #7
    JacobMonster's Avatar
    JacobMonster is offline At The Back Of The Pack Arm chair racerFirst time rider
    Join Date
    May 2015
    Location
    Liberty, Ky
    --
    232
    Heres my problem.
    I alighn my cam to the second mark on the flywheel, as stated.
    Then i move to the first timing mark, and set my CDI. Problem is, the CDI is also pointng to the right a little, about 1 oclock, even when the cam is in the right spot, ans the dowel pin in the cam is at 11 oclock.
    One more question, with the timing marks, what is the one that has the 2 dotz that you can see through the timing holes?

    Sent from my VS980 4G using Tapatalk

//ArrowChat Integreation Code //