
Nice looking build Lou!! Can't wait to see it completed! You sure put alot of time into it!

 Testicles between my toes at the devils backbone
Teaching quads a lesson
Testicles between my toes at the devils backbone
Teaching quads a lesson
Nice looking build Lou!! Can't wait to see it completed! You sure put alot of time into it!
TF 07,08,09,10,11,12,13,14!
Raffa's IceFest 08, 09, 10,11,13!
SAY IT!!!!!BUD LIGHTS AND RED LIGHTS!!!!!!
The purveyor of "Plan B"
Teaching quads a lesson
Thank you for the kind words. I try to be my own worst critic. If I point out my own flaws not much left for others to point out right? Lol all I can say is I'm getting better and it won't fall apart, that is for certain.
Originally Posted by thcowboy

"Yes its broken, but does that really surprise you?."
"What happened? What does it look like happened?!?!"
Power User
Catch me if you can
Louis, as usual your projects come out fantastic.
I also share this. I have owned a 2500$ Miller TIG for a year and I STILL CANNOT WELD ALUMINUM!! I have tried and tried and walk away hating myselfI bought TIG welding for dummies, specific Tungsten rods for Al, one green wheel ONLY for Al and grinding the snot out of the coating to clean it spotless.
So, please, no one ever send me anything aluminum to weld,
You are one persistent driven man and I have huge respect for that!!
All our government does is distract us while they steal from us, misspend our tax $ and ruin our country
Power User
Got the holeshot
If the water truck at Haspin breaks down, he can use the reverse and tow it back to the barn with the front end. 😋. I don't belive it is overkill, some may laugh and joke about it now, but no one will laugh when it doesn't break or buckle. I don't know about anyone else, but I'd feel like a fool for not taking the time to sturdy it up and have it fold up like a lawn chair off of a jump.
Build looks great so far. Don't get in a hurry and muck up all of the great work so far.
my feedback thread http://www.3wheelerworld.com/showthr...-hoosierlogger
TRIKEFEST 11, 12, 13, 14, 15, 16
Current rides
Taurus 650 (green)
85 250es big red
83 ALT50 (5 year old daughters)
82 ALT50
82 ALT50
84 atc 70 stroked big bore 90 STILL in progress.
71 QA50
93 TRX 300 FW
You might be strong as an ox, but without a cart you are just a big dumb animal.
First Time Rider
Arm chair racerNew to the board
Updates?
1982 big red
1974 atc 90
Life is hard, but its harder if you're stupid - John Wayne
The purveyor of "Plan B"
Teaching quads a lesson
Well honestly I wasn't planning on updating until after I had the oil tank done but since you asked lol.
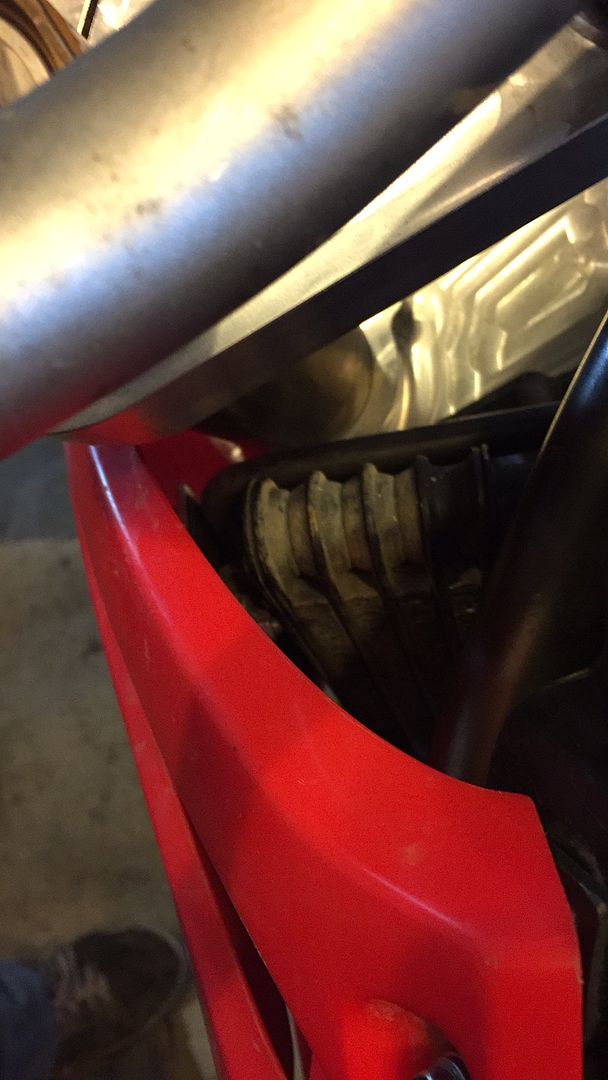
This past week I got the oil cooler mount built.
It's fairly simple, I took some 1/2" thick cold rolled rod and heated it with an acetylene torch in order to bend it to shape. I was going for a shape similar to atc250r radiator brackets. I think I succeeded.
Then I made a pattern of the side mount, transferred it to some plate, cut it out with a jig saw and added some decorative speed holes, and welded it up. (pics show it tacked but i did finish weld it)
Mounted up!
Go to need to make some adjustments when I run the oil lines but otherwise a good fit.
"Yes its broken, but does that really surprise you?."
"What happened? What does it look like happened?!?!"
The purveyor of "Plan B"
Teaching quads a lesson
I had previously finished reworking the front tank mount, made it smaller and welded in the threaded insert for the bolt that screws into the frame.
I also worked on some shroud relocating brackets as the shrouds needed to be in thier final position before I could build the oil cooler mount.
Due to the placement of the tank,the shrouds sat farther forward then I was really happy with. Unfortunately this was necessitated by the fact that the shape of the bottom of the crf tanks limit where they can be mounted specifically. The bottom of the tank needs to clear the head while remaining somewhat level so that no one portion of the fuel tank is in the lowest position. If the tank is tilted too far back it creates a "unreachable well" where fuel would sit but never be reached when the tank was empty to the fuel line bung and screen. These considerations placed the tank a bit too far forward in relation to the head tube. The tank itself wasn't a problem but the shrouds were another matter. The forks made contact with the shrouds at full steering lock and that wasn't acceptable. I also wanted the backside of the shrouds to sit out further to be more contoured with the sides of the seat so ultimate the answer to both problems was to come up with some brackets that mount to the tank which relocated the shrouds to the correct position.
These were fairly simple to make as they are some thin flat bar stock bent to the contour of the tank, with mounting holes, nuts, and spacers welded together.
I don't really have a good before picture but take my word for it, the sides of the seat hung over the sides of the shrouds considerably. This fit is much better.
A note, the bung that will hold down the front of the seat hasn't been completed, once in place the front of the seat will be pulled down against the tank securely.
Last edited by Louis Mielke; 02-06-2015 at 06:29 PM.
"Yes its broken, but does that really surprise you?."
"What happened? What does it look like happened?!?!"
Power User
The day begins with 3WW
That's real nice Louis.
My feedback: http://www.3wheelerworld.com/showthr...k-for-ATC-Eric
Survivor! TF: 07, 08, 09, 10, 11, 12, 13 Sandpuppies: 07, 08, 09, 10, 11, 16, 17, 18 Imperial Invasion 09, 10, 11, 13, 15, 16, 17, 18, 19, 20
Everything Big Bore on FaceBook
New to the board
Arm chair racerNew to the board
nice work you definetely have some great fab skills
shame those welds arent as nice. as a welder i can honestly say that it is harder to fab than it is to weld. why not mig weld it? not like the materials too thick
The purveyor of "Plan B"
Teaching quads a lesson
Well in truth the plan is to get better at tig welding, only real way to do that is to well, do it. lol. Sadly welding coupons together gets old fast am I right?
"Yes its broken, but does that really surprise you?."
"What happened? What does it look like happened?!?!"
The purveyor of "Plan B"
Teaching quads a lesson
Well had some more time to do some more work. First up I attached the steering stop. This is rough fitment and is subject to change.
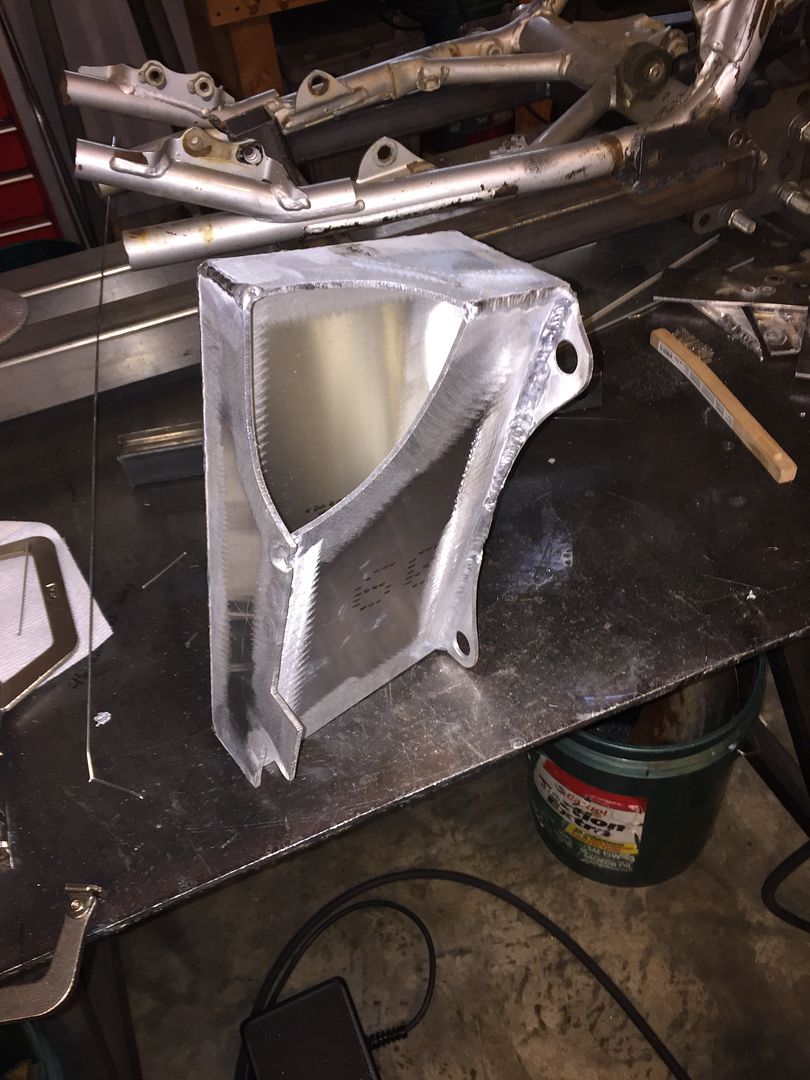
Next up did some major work on the oil tank. It's not complete yet but the hard part is done. I started by making several cardboard and paper versions of the tank until I was somewhat happy with the fitment and then I cut out the piece from aluminum and put them together.
The tank is mounted up with rubber grommets and bushings similar to how radiators attach. I've left plenty of room for the triple tree/fork to clear as I still have some final adjustments to make for the steering stop/full lock. Not a whole lot to say otherwise. I'll just post up the pictures. I think I finally got a handle on the aluminum welding. Can only get better from here out.
"Yes its broken, but does that really surprise you?."
"What happened? What does it look like happened?!?!"
The purveyor of "Plan B"
Teaching quads a lesson
"Yes its broken, but does that really surprise you?."
"What happened? What does it look like happened?!?!"
The purveyor of "Plan B"
Teaching quads a lesson
That's pretty much it for now. I need to do some work on the steering stop. Need to get a little more rotation out of it. I'm thinking I may have to adjust the oil cooler mount. That'll suck but hey, what needs done needs done. Next will be shaping the metal to fill the cutout in the oil tank and making sure it doesn't leak. That's going to be interesting. Then I can focus on plumbing the oil lines. Slowly but surely marching towards a ride able machine. Can't wait!
"Yes its broken, but does that really surprise you?."
"What happened? What does it look like happened?!?!"
First Time Rider
Arm chair racerNew to the board
So the 400ex has a dry sump oiling system and thats why you need the oil tank, right? Sorry for the dumb question.
Last edited by thcowboy; 02-27-2016 at 04:47 PM. Reason: Spelling
1982 big red
1974 atc 90
Life is hard, but its harder if you're stupid - John Wayne
Power User
Got the holeshot
I was thinking maybe 3-4 holes drilled through the tanks face with 1"-1 1/2" tubing welded in would look trick, run cooler and make good use of your tank shrouds.
Oil tank radiator if you will.
Email- onformula1@hotmail.com Rebuilt, Revalved, custom springs, lowering, forks & shocks, Custom Suspension, all brands, 2-3-4 wheeler's- PM or Email with questions.
***Check out my album for cool pictures*** http://www.3wheelerworld.com/album.php?albumid=2527
As always- Everything I post is IMHO.

 Reply With Quote


