Looking for any info on gusseting 85-86 250r frame.Im planning to race Unadilla trike race this year.Also any tips on front and rear mx suspension setups.

 Power User
Got the holeshot
Power User
Got the holeshot
Looking for any info on gusseting 85-86 250r frame.Im planning to race Unadilla trike race this year.Also any tips on front and rear mx suspension setups.
250r rules
Power User
Teaching quads a lesson
Rebuild/revalve rear shock and linkage, also get inverts to replace the front end, there are several people on this board who build and sell conversions for it. I have a ktm 105sx front end(bought from a member on this board) on mine and trx250r elka shock on mine, it soaks up things very good.....and turns alot of heads.
Power User
Got the holeshot
Thanks for the reply .I have an extra 86 rear shock that I want to send out for a rebuild/revalve for my weight. I don't want to spend a lot on the usd fork swap . Im going to have the stock front forks rebuilt with progressive spings. Unadilla has some big jumps.I read that the usd setup is hard on the stock frame steering head.Originally Posted by deathman53

250r rules
The purveyor of "Plan B"
Teaching quads a lesson
A lot of the old frames are pretty stressed to the max so it is a risk to be concerned about installing a stiffer invert front end. Jason Hall does an excellent job of gusseting stock frames for strength.
"Yes its broken, but does that really surprise you?."
"What happened? What does it look like happened?!?!"
Power User
Got the holeshot
I have seen Jacobs 330r with the inverts on it he rips on that trike.I didn't get a close up look at though. I was hoping to get pics of some gusseting so I don't have to ship a frame out. I can weld and I know a couple guys that weld for a living.
250r rules
Power User
Catch me if you can
As Lou suggested, I'd talk to Jason Hall. Even if you don't want him to do it, just give him a call.
I haven't seen a neck break yet but it will. I already broke off the right side of the upper wishbone on my 350RX, so I have to do some work on the neck this winter running inverts.
The R seems to have allot of stress on the upper main tube, Kintore broke his, but I'm sure it's got stress in plenty of other places.
I don't know how big you are, Jason's son Jacob is a pretty lean kid and mostly muscle. He's a very smooth yet aggressive rider and he hits BIG jumps.
I'm surprised he hasn't gotten another low hour and low stress frame to gusset. I bet he's headed in a different direction now anyhow with Jason Hall having the ability to convert a MX frame to 3wheels now.
And Louis isn't too far behind him; 2 very smart people that couldn't be nicer to work with IMHO......
All our government does is distract us while they steal from us, misspend our tax $ and ruin our country
FACT ! I have no edit button
Arm chair racerThe day begins with 3WW
You will likely get a lot of good suggestions for suspension, below is just one option . . Unadillas ATV track is also very bumpy.
FRONT FORKS
For an '85, the stock oil is ATF transmission oil which is around 7wt . . The oil level is 7.3 inches . . Irregardless of what spring you use, I would try 15 wt oil at 6.75 inches . . The heavier oil will slow the forks down when you land, plus it will increase your rebound damping which you will likely need with stiffer springs . . The slightly higher oil level will make it slightly more resistant to bottoming.
I would also call progressive directly to see exactly what they currently have . . They supposedly make at least 2 different rates . . p/n 11-1117 which is 30/40 lbs and p/n 11-1127 which is 30/45 lbs . . . I know guys that weigh close to 200 with gear that can occasionally bottom their forks out with the 11-1127 springs on their 250R's, so if you are near that weight, and/or do big jumps, I would consider stepping up to the next stiffest spring they make if they make one, otherwise get the 1127's, but hopefully others here have used them also and can give you their experience with them.
Either way, the 1127 springs combined with the heavier oil and higher oil level should be able to prevent hard bottoming off reasonably big jumps for most riders.
Here's 2 places to get the lowest price on them.
http://www.amazon.com/Progressive-Su.../dp/B000HS4WYU
http://cycleplicity.com/products/180...FZKCfgodnsALdQ
Cut some pcv tube to use for front spring spacers that are 1/2 and 1" longer than the ones you start with in case the front is too low or the springs are too soft and it sags too much etc.
Take a 10 gallon air can so you can add air to the forks if they are too soft . . I wouldn't use more than maybe 7 lbs.
Take a high quality low pressure air gauge.
Take some 15 wt oil in case you need heavier oil.
REAR SHOCK
I would at least contact Race Tech Suspension for suggestions on the rear based on your weight and swing arm length etc . . Their labor cost to clean and rebuild most shocks is only $100.00, and they are one of the biggest and best suspension rebuilding and modification companies around.
Their turn around time is also usually less than 1 week, so why take chances with anyone else whom may have far less knowledge and experience, and whom may also take much longer to return your parts.
They are also the inventors of the very popular Gold Valve Emulators, so no one knows how to tune this system better then they do . . This valve can be added to your stock forks or rear shock and it will improve performance, or they can revalve your stock shock valving.
Phone 951-279-6655
http://www.racetech.com/
Race Tech also did the suspension for this 250R Magazine build.
http://atvondemand.com/1985-1986-hon...roject-part-1/
.
Power User
Roostin Away
A couple good places to gusset the 85-86 250R is the square tube above where the exhaust pipe comes through the frame. The main tube under the tank. Also the side tubes that come down to the swingarm pivot area. Most of the R's that I have seen break have been jumped big and bottomed out hard. When the suspension hits the stops Hard the stress on the frame is a lot worse. Also like Louis stated rust is a big problem. Most of the time you can't see the rust because it is inside of the tubes. I would try to find a clean west coast frame to start with. Another weak spot is the footpeg mounts on the 85 frames. A 86 is much stronger in the peg area.
83 ATC 60-R Cr60 converted with Zinger parts.
83 ATC 70.
83 Tri zinger
ATC 85-R Cr85 engine on shortened 86-R frame.
ATC450AF
86 310-R Drag racer
440 snowmobile powered custom built.
87 Cr 500 Converted to Drag racer
FACT ! I have no edit button
Arm chair racerThe day begins with 3WW
.
I see Jason has given you some info . . I started this a couple hours ago and maybe if Jason sees it and can add or change anything, it might help you a bit more.
I have never seen an instantaneous catastrophic frame failure . . On the broken frames I have seen, they always started with a crack that went unchecked until the failure occurred . . At Kawi, we inspected every bike we tested for cracks at specific time intervals . . If a crack occurred, we would measure its length then mark the end of it then beat the crap out of it some more until eventually we felt it was unsafe to ride or the test was over . . After this, I would repair the cracks then add gussets where I thought they were necessary then we would beat the crap out of it again etc until it no longer developed cracks.
The point being that no matter what you do to strengthen it, it still may crack somewhere else because the stress/load has simply been moved to a different place from where the gusset was added, so every bike that gets flogged should be inspected for cracks periodically no matter how many gussets are added to it.
You could also check with HREATV to see if they make any kits for it or see if they have other parts you might want.
http://www.hreatv.com/productionparts.html
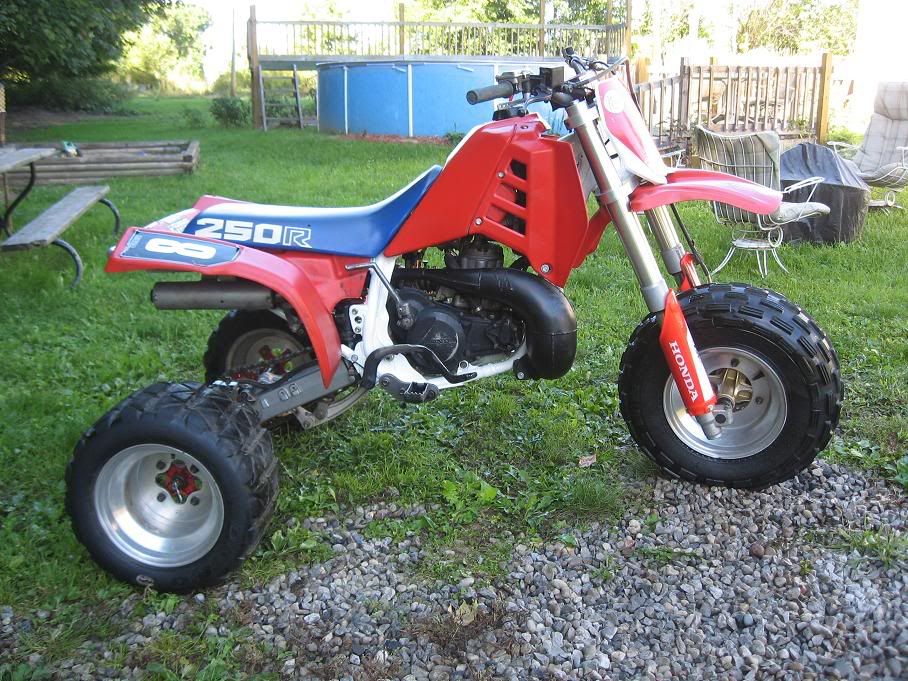
Below are couple shots of Jasons bike I shamelessly plagiarized off the internet . . I would guess he will send you more if you ask him, but from what I can tell, which isn't a lot, it doesn't look like he has done any reinforcing on the steering head . . It is also nearly impossible to break to steering head off one of those or most any bike unless the frame is rusty as mentioned, and/or gets bottomed hard as Jason mentioned, and if anything was going to break on the front, it would most likely be the down tube and the wishbone tubes.
DOWN TUBE
If Jason doesn't do anything to the steering head or down tube and you are worried about it breaking, one option would be to simply get a piece of 5/16" thick flat metal the width of the front of the down tube that will run from the gusset/bracket on the bottom of the tube all the way up to where the factory gusset/bracket is near the top, which is just below the Honda sticker on the side of the frame in the first photo, then weld it to both gussets and fully weld the sides and bottom to the down tube . . You will need to cut a slight V into the bottom of the new plate so it follows the contour of the bottom gusset/bracket.
BRACKET REMOVAL
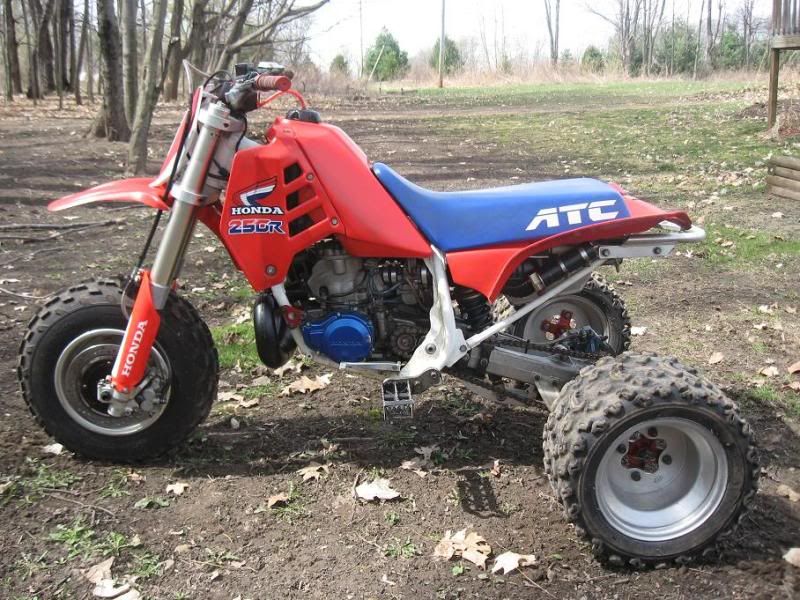
It looks like he removed the small mounts that are on both sides of the steering head which can also be seen in the photo of the right side.
REAR SECTION SEAT AND FENDER SUPPORT
He made the rear section removable as he mentioned, however, you can put small triangle brackets on the rear section where it meets the frame like the 350x below has, but they can be smaller than that . . 3/16 inch material is thick enough . . You can also put holes in them to lighten them like Honda did on the top one seen in the photo.
SWING ARM BRACKET AND REAR VERTICAL FRAME TUBE
It looks like he attached a gusset to the leading edge of the existing swing arm gusset then extended it upward and down ward.
MAIN BACKBONE TUBE UNDER TANK
If Jason means that this tube can break somewhere between the steering head and where the rear part of the frame attaches, you can get a .125" wall tube that has the same id as the od of the backbone, then cut it in half lengthwise and long enough so it will weld to the steering head and the top bracket near the rear frame, then weld the sides completely.
1985 FOOTPEG BRACKET
I don't know where these mounts break, but my guess is that they can tear the metal around the perimeter of the nut insert which is on the inside of the bracket . . If this is the area they break at, it looks like, a flat piece of 3/16" thick metal the same size as the bracket could be placed on the face of it then fully welded . . The radius on all sides of the bracket will act like a pre-made groove for the weld to fill in . . Obviously this will move the footpegs out 3/16" but big deal.
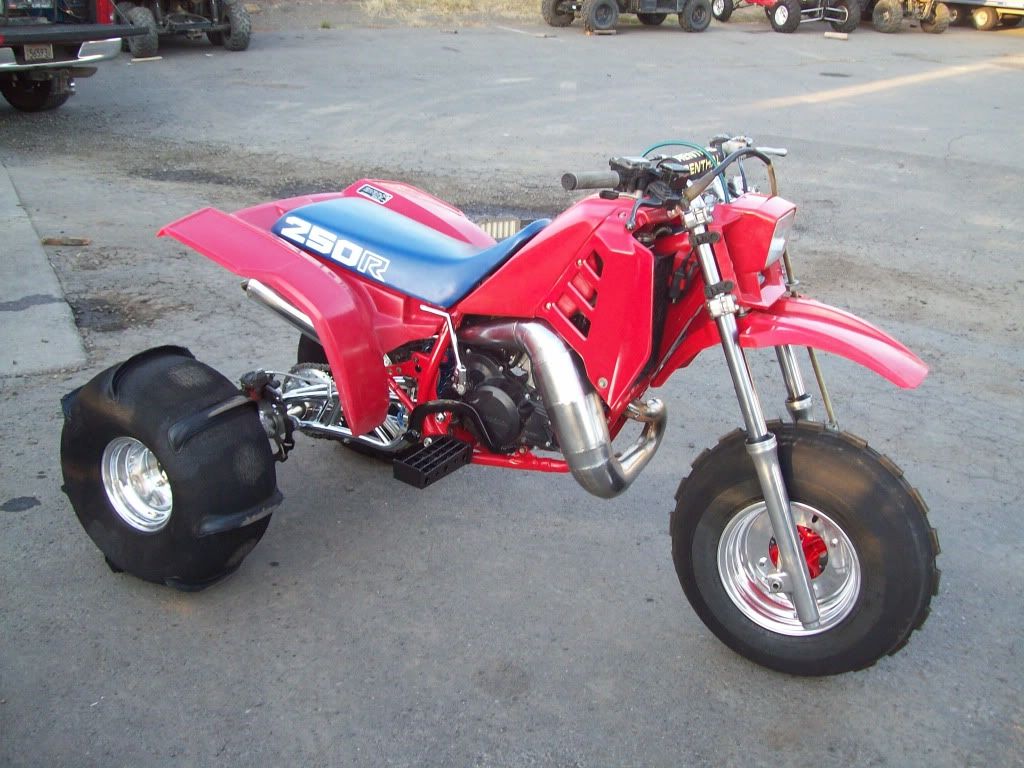
FRONT STEERING ANGLE
It looks like he used non staggered triple trees . . If so, this brought the steering angle way in, and along with the leading front axle, it made it much more like....dare I say it....A "TECATE...The Best Turning 3 Wheeler In The Universe".
..........
1986 250R FOOT PEG MOUNTS
1985 250R FOOTPEG MOUNT
SOME NICE WIDE FOOTPEGS LIKE THIS MIGHT HELP SAVE YOUR FEET ON HARD LANDINGS BY SPREADING THE LOAD OUT OVER A WIDER AREA
1985 STEERING HEAD GUSSET
ATC 350X WITH TCP GUSSET KIT

FACT ! I have no edit button
Arm chair racerThe day begins with 3WW
.
What are you going to run for rear tires?
Power User
Got the holeshot
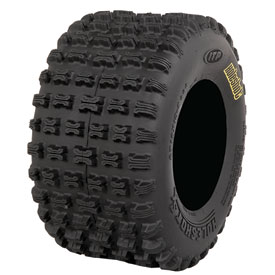
Thanks for all the replies. Jason I didn't get a chance to meet you and Jacob at Airmx back in October. I raced the 200 class #81. Barnett Im using 18x9.50x8 flat track style tires right now. Im thinking for mx either 18x9.50x8 holeshots or Razrs. second choice turf tamers. Im more concerned with the frame down tube ,backbone and rear frame that Jason metioned above.Im also buying a plus 4 adjustable LSR axle. I have a couple extra frames that I can gusset Im not going to use my 85 250r that Iv had since 85. The 350x frame above gives me a good idea where to start.


Last edited by atc300r; 12-03-2015 at 11:10 AM.
250r rules
FACT ! I have no edit button
Arm chair racerThe day begins with 3WW
.
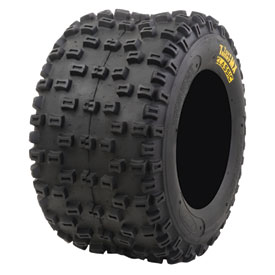
Ok, I would not run a flat track tire there and instead would run the ITP HOLESHOT MXR6 tire over the Turf Tamer Classic MX mainly because of the lug pattern/spacing . . My guess is that the Turf Tamer will still be decent either way though . . I would also run 4 ply tires and a 9" rim if you have any that size . . The 9" will also provide a little wider selection of tires, many of which are 4 ply . . The 2 ply tires just roll under in the turns a little more which makes the bike more tippy and harder to slide, especially on tracks that have xlnt traction like some areas of Unadilla does . . Also, it will be easier to slide if the swingarm is longer than stock.
If you do run a knobby, I would run one that where the lugs are rounded on the outside to make them slide easier and all the tires below generally have that feature . . Tires that have sharp lugs on the outside will try to dig in more instead of sliding which can cause great displeasure . . Also horizontal rows of lugs will slide easier than staggered ones like the Turf Tamer has if all else is equal, and lugs that have a fairly big amount of space between the horizontal rows like the MXR6 and the bottom tire have will slide easier but hook up better in a straight line than a staggered lug pattern will if all else is the same.
ITP HOLESHOT MXR6 18x10x8 2 PLY
http://www.bikebandit.com/tires-tube...-mxr6-atv-tire
ITP TURF TAMER MX 18X10X8 2 PLY
https://www.rockymountainatvmc.com/p...mer-Classic-MX
ITP HOLESHOT SX 18X10X8 2 PLY
https://www.rockymountainatvmc.com/p...ot-SX-ATV-Tire
This rear pattern would also slide fairly easily but they don't come in your size.

FACT ! I have no edit button
Arm chair racerThe day begins with 3WW
.
I'll post more detailed frame mod suggestion in a little while.
FACT ! I have no edit button
Arm chair racerThe day begins with 3WW
.
ok, hopefully Jason will post again but if he doesn't, i can tell you with 110% certainty, that if you do any of the mods the way i described them, these areas will never, ever break, it just ain't gonna happen.
As far as the forces on the bike go, the down tube is mainly getting pulled . . A lesser force is twisting . . In other words, if you pull or push on the forks from the side, this is the twisting force I'm referring to . . The thickness of the 5/16" plate I suggested for the down tube is roughly equivalent to the thickness of the down tube if you were to add all four sides together . . This means that the tensile strength, or resistance to breaking from being pulled on will be double . . This is a ridiculous increase in strength . . It also means that it's resistance to twisting and deflecting to the side will be greatly increased.
Adding the 1/2 tube to the full length of the backbone will increase its strength by around double . . Adding a plate to the face of the '85 foot peg bracket will increase its strength by around at least double.
EXISTING STEERING HEAD GUSSETS
There is around a 1 1/2" hole in the side of each gusset that is attached to the rear of the steering head where water and dirt can enter . . I would install a piece of .125 wall pipe in this hole that is long enough to connect the holes in both halves of this gusset and weld it y them . . If the gusset is two pieces and not welded on the back end where they come together, I would weld the two halves together.
There is an opening in the bottom steering head gusset that the Honda sticker is applied to . If you install the plate to the front of the down tube, the front of the existing gusset will be welded to the plate but it will still be open on the side at the bottom just below the sticker . . I would weld this to the existing down tube.
LOWER TUBES TO DOWN TUBE
There is one formed lug on the end of both wishbone tubes that connect to the site of a bracket on the bottom of the down tube . . This looks like it was furnaced brazed to me . . If Jason says the weld that attaches this lug to the bracket can break, I would simply weld them to the bracket.
BACKBONE REINFORCEMENT
The new half tube added to the top of the backbone will end where the tank mount bracket is on the top of the frame . . There is a factory half tube gusset on the bottom side of the backbone directly below the tank mount bracket . . Add a piece of half tube to the bottom of the backbone that is 3" long and shape the end so it follows the shape on the end of that gusset, then butt the new piece up to it and weld the two pieces together . . If that factory gusset has any weld on the bottom side where the new piece will be butting up to, which it probably doesn't, carefully grind the weld away so the new piece can weld directly to that existing gusset instead of having a gap so it has to be welded to the frame . . This will reinforce the weak spot between the end of that factory gusset and the new one you put down the entire length of the backbone . . Welding the new piece to the frame instead of the existing gusset will leave a weak area between the end of both pieces.
There is another gusset that connects a tube that comes from the front down tube to the bottom of the back bone . . This gusset may not be fully welded to the back bone . . You can weld any open areas to the back bone if you want.to.
REAR VERTICAL FRAME JASON MENTIONED
If you want to reinforce those tubes, but for whatever reason you don't want to do it on the front side like Jason did you can achieve about the same thing by doing it on the back side.
Remove the fairly useless existing upper gussets that have the round hole in them.
Make the new gussets similar to the ones in the TCP 350X photo, but where the top and bottom one meet in the middle of the frame, just shape them so they extend from the frame by around 1/2" . . A one piece gusset will also be a little better but you can make two of them then butt weld them where they come together then grind the weld flat.
You can locate the left side one on the outside of the existing air box box bracket, then cut a hole in the gusset so you can access the forward air box bolt.
On the right side, you can eliminate the brake master cylinder mount and mount it to the new gusset instead.
Make these big gussets from 3/16" thick mild steel plate and weld them on the inside and outside . . Drill just about as many lightening holes in them that you want . . This will also give it a "WORKS BIKE" appearance.
This will kill two birds with one stone and preserve the appearance of the front of the frame tube which is far more noticeable.
You can make a plate that will weld to the front of the swingarm pivot bolt bracket . . Start it just below the center of the bolt and extend it downward then forward onto the lower tube around 1 1/2" beyond where the existing bracket ends . . Make it the same thickness as the swingarm mount and make it 1/2" high on the lower tube and have it taper to 0 where it ends with around a 45 degree taper.
MOCK UP PHOTOS
If you want, you can make the vertical frame gussets out of cardboard or manilla folders and use that as a template . . You can also tape these templates in place and take photos of them if you want, then I and others can offer opinions on whether they are too small or bigger than they need to be etc.
If had some way to draw them in on a photo and post exactly what I would suggest, I would be happy to do that but unfortunately I don;t have anything practical to do that with.
LOWER FRAME REINFORCEMENT
Instead of extending the swingarm pivot mount onto the lower frame tube, you can make a triangle shaped piece to lay on top of the open triangle area where the small angled tube connects t the side and rear frame tubes . . Make it from 3/16" mild steel and cut 3/8" off f the three points on it so there will be a slight gap between the points and frame when installed and leave this area open . . Make it so it does not sit on the very top of the tubes but so it will be about level with the top of the tubes when installed . . This is mainly for appearances sake . . You can drill a 3/4" to 7/8" hole in the center of those plates if you want . . If you put them on the bottom side of the frame, they will trap water and dirt.
This will reduce the chance of the tubes breaking in that area plus it will reduce the frames potential to compress.

FACT ! I have no edit button
Arm chair racerThe day begins with 3WW
.
ok, I figured out a cheesy way to illustrate the gussets i'm suggesting you can install if you want . . the proposed gusset is the white area.
.....................................

 Reply With Quote