//ArrowChat Code
Results 1 to 7 of 7

Thread: 1982 185s Tank restoration

  1. #1
    wellys88 is offline At The Back Of The Pack Arm chair racerFirst time rider
    Join Date
    Nov 2015
    Location
    WA
    --
    194

    1982 185s Tank restoration

    Have 4 185'S Decided to start to redo them one by one, Started stripping one and redid the tank, It had 2 wholes which i brazed, I cleaned the rust from inside by putting a bot of chain in the tank along with a handfull of snall nuts and bolts, sealed cap and outlet and strapped pillows around it with ratchet straps and put it in dryer, after the majority of rust was removed i used vinegar to further clean the rust, alot of nasty came out after a few days soaking, I nutralised the vinegar with baking soda and distilled water, then i washed that out with soapy water then clear water, blew it out with a compressor then let it sit outside to dry for a few days, when done, I used redkote sealer, Click image for larger version. 

Name:	image.jpeg 
Views:	10 
Size:	1.18 MB 
ID:	235571

  2. #2
    wellys88 is offline At The Back Of The Pack Arm chair racerFirst time rider
    Join Date
    Nov 2015
    Location
    WA
    --
    194
    Started to fill all the small dents with bondo and glazing puttyClick image for larger version. 

Name:	image.jpeg 
Views:	9 
Size:	1.57 MB 
ID:	235572Click image for larger version. 

Name:	image.jpeg 
Views:	9 
Size:	1.57 MB 
ID:	235572Click image for larger version. 

Name:	image.jpeg 
Views:	5 
Size:	1.41 MB 
ID:	235573Click image for larger version. 

Name:	image.jpeg 
Views:	4 
Size:	1.67 MB 
ID:	235574

  3. #3
    wellys88 is offline At The Back Of The Pack Arm chair racerFirst time rider
    Join Date
    Nov 2015
    Location
    WA
    --
    194
    Sanded bondo with 80grit them 180, then 320, then i gave it 3 coats of high build primerClick image for larger version. 

Name:	image.jpeg 
Views:	6 
Size:	1.27 MB 
ID:	235575Click image for larger version. 

Name:	image.jpeg 
Views:	6 
Size:	1.27 MB 
ID:	235575Click image for larger version. 

Name:	image.jpeg 
Views:	3 
Size:	1.51 MB 
ID:	235576jClick image for larger version. 

Name:	image.jpeg 
Views:	3 
Size:	1.51 MB 
ID:	235576

  4. #4
    wellys88 is offline At The Back Of The Pack Arm chair racerFirst time rider
    Join Date
    Nov 2015
    Location
    WA
    --
    194
    Filled low spots and began sanding again, started with 320, then 400,600 and 800 wet and dry, got it smoth and began to paint, i used Rustoleum sunrise red which i mixed with wetlook hardner and thinned it to put through the gunClick image for larger version. 

Name:	image.jpeg 
Views:	11 
Size:	1.17 MB 
ID:	235577Click image for larger version. 

Name:	image.jpeg 
Views:	6 
Size:	161.8 KB 
ID:	235578Click image for larger version. 

Name:	image.jpeg 
Views:	8 
Size:	949.5 KB 
ID:	235579Click image for larger version. 

Name:	image.jpeg 
Views:	16 
Size:	66.8 KB 
ID:	235580Click image for larger version. 

Name:	image.jpeg 
Views:	8 
Size:	68.3 KB 
ID:	235581 
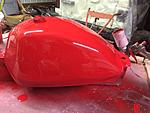
admidts my hard work this little guy decided to go for a paddle

  5. #5
    wellys88 is offline At The Back Of The Pack Arm chair racerFirst time rider
    Join Date
    Nov 2015
    Location
    WA
    --
    194
    And the finished with new reproduction decal set, set the tank on the big red just to see how it looked on a complete bikeClick image for larger version. 

Name:	image.jpeg 
Views:	22 
Size:	1.24 MB 
ID:	235582Click image for larger version. 

Name:	image.jpeg 
Views:	16 
Size:	1.41 MB 
ID:	235583

  6. #6
    wellys88 is offline At The Back Of The Pack Arm chair racerFirst time rider
    Join Date
    Nov 2015
    Location
    WA
    --
    194
    Sanded bondo with 80grit them 180, then 320, then i gave it 3 coats of high build primerClick image for larger version. 

Name:	image.jpeg 
Views:	6 
Size:	1.27 MB 
ID:	235575Click image for larger version. 

Name:	image.jpeg 
Views:	6 
Size:	1.27 MB 
ID:	235575Click image for larger version. 

Name:	image.jpeg 
Views:	3 
Size:	1.51 MB 
ID:	235576jClick image for larger version. 

Name:	image.jpeg 
Views:	3 
Size:	1.51 MB 
ID:	235576

  7. #7
    Join Date
    Mar 2016
    Location
    Carbondale, IL
    --
    43
    Man, that looks good. I just used a combination of JB Weld and solder to fill a couple holes on my tank and then coated the inside with POR-15. That stopped the leaks, but the outside of mine could still use some TLC.

//ArrowChat Integreation Code //