//ArrowChat Code
Page 1 of 2 1 2 LastLast
Results 1 to 15 of 21

Thread: 1983 Selvy 300R - The Dragon - Build Thread

  1. #1
    brandonlowe2's Avatar
    brandonlowe2 is offline At The Back Of The Pack Arm chair racerAt the back of the pack
    Join Date
    May 2016
    Location
    Georgia
    --
    412

    1983 Selvy 300R - The Dragon - Build Thread

    In November 2016 I purchased a 1983 ATC 250R site unseen. It was supposedly a good strong running machine. When I arrived to pick it up it was anything but. There was no carburetor, air filter, thumb throttle and I am sure another 50 parts missing. Bathroom silicone plugged a gaping hole in the stator cover and was sealing the clutch cover, plus the cylinder head was weeping oil. For some reason, I still gave the guy $900.00. If you’ve ever seen the money pit with Tom Hanks, welcome to my life.

    I have learned quite a bit about these old machines over the last year and even though I still consider myself a newbie, at the time I received this bike I knew nothing at all. I thought I had a 1983 stock 250r roller and started second guessing the decision to buy it. I was determined to get it running because it was originally going to be a gift for my best friend that his family and close friends all went in with me to buy. I eventually traded him a very nice '85 250R to "buy him out" of his portion of the bike.

    I posted a few pictures here on 3WW (you can search my posts and see the last year of posting about this bike) and it didn't take long to find out that I had quite a rare piece of history in my hands. The first thing that stuck out like a sore thumb to the 3WW community was that I had a Hondaline 300R top end. This was encouraging news considering how rare I soon found out those were. I was also informed that I had a sectional pipe, but no one could pin point the original manufacturer. After much debate a friend of mine sent out the pics to a couple “historians” and it ended up being an original Selvy Sonic II pipe made by Kenny Roberts! Those two things alone made the $900.00 investment worth it, which is a good thing because that is just about where the useable parts ended. I will go through the entire process with as many pictures as I can and tell exactly what we had, and what we had to fix or replace.

    Brendon Yaeger at Yaeger Performance Machines (YPM) headed up the entire build for this. I know that there are several talented and knowledgeable builders on this forum so this review of YPM is only a reflection of his work and professionalism and is not meant to point fingers and say YPM is better or worse than anyone else. Having said that, he is extremely knowledgeable and professional. I can't imagine one of my machines in any other shop than his.
    At the heart, Yaeger is a huge fan of OEM and I am aftermarket/custom. So, this build was a weekly conversation in the “war room”. In the end, the 300R ended up being about 50/50 OEM and custom. I believe the mix of history vs. contemporary really came together and created a stunning package that far surpassed what I originally thought was possible.
    This is what the bike looked like when I first bought it and at the time that I thought it was just a stock 250r:

    Click image for larger version. 

Name:	2016-11-02 08.04.51.jpg 
Views:	68 
Size:	1.68 MB 
ID:	250360 Click image for larger version. 

Name:	2016-11-02 08.04.41.jpg 
Views:	56 
Size:	1.85 MB 
ID:	250361 Click image for larger version. 

Name:	2016-11-02 08.12.58.jpg 
Views:	52 
Size:	2.65 MB 
ID:	250362

    You can imagine my disappointment when this 250r that was referred to me as a "Beauty Queen" that "Runs Strong" arrived and not only did not run, but looked absolutely horrible.

    Click image for larger version. 

Name:	2016-11-02 08.04.57.jpg 
Views:	40 
Size:	1.71 MB 
ID:	250364 Click image for larger version. 

Name:	2016-11-02 08.06.00.jpg 
Views:	42 
Size:	2.62 MB 
ID:	250365 Click image for larger version. 

Name:	2016-11-03 17.30.09.jpg 
Views:	43 
Size:	1.51 MB 
ID:	250370 Click image for larger version. 

Name:	2016-12-07 20.08.26.jpg 
Views:	51 
Size:	2.20 MB 
ID:	250371 Click image for larger version. 

Name:	2016-11-02 08.05.29.jpg 
Views:	34 
Size:	2.09 MB 
ID:	250372

    For the life of me I can't figure out why the seller put new tires on a machine that (later after tearing into the motor found) was impossible to run mechanically speaking. But, at least I got some nice tires.... that I use on a different machine.

    Click image for larger version. 

Name:	2016-11-02 08.05.52.jpg 
Views:	37 
Size:	2.33 MB 
ID:	250366

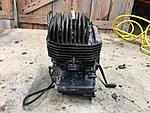
    This was the picture that later became valuable to me. A very nice Hondaline 300r Top End!

    Click image for larger version. 

Name:	2016-11-02 08.05.45.jpg 
Views:	50 
Size:	2.54 MB 
ID:	250368 Click image for larger version. 

Name:	2016-11-02 08.06.11.jpg 
Views:	60 
Size:	2.42 MB 
ID:	250369 Click image for larger version. 

Name:	2016-11-15 22.11.34.jpg 
Views:	43 
Size:	2.05 MB 
ID:	250373 Click image for larger version. 

Name:	2016-11-15 22.10.56.jpg 
Views:	38 
Size:	2.70 MB 
ID:	250374 Click image for larger version. 

Name:	2016-12-07 20.35.47-1.jpg 
Views:	52 
Size:	2.34 MB 
ID:	250375 Click image for larger version. 

Name:	2016-12-07 20.35.59.jpg 
Views:	88 
Size:	1.54 MB 
ID:	250376 Click image for larger version. 

Name:	2016-12-21 20.40.53.jpg 
Views:	50 
Size:	2.86 MB 
ID:	250377


    Nice huh?

    Click image for larger version. 

Name:	2016-11-02 08.06.11.jpg 
Views:	60 
Size:	2.42 MB 
ID:	250369

    Believe it or not, this all original Selvy Sonic II pipe was sent back to Kenny Roberts. He had to weld a new section from the sectional to the exhaust flange and created an all new matching Sonic Silencer for it (oh yea did I mention the silencer was missing too?) YPM then refinished the pipe to an original raw finish. For me it is hard to believe this is the same pipe.

    Click image for larger version. 

Name:	2018-02-18 17.42.33.jpg 
Views:	67 
Size:	2.04 MB 
ID:	250378 Click image for larger version. 

Name:	2018-02-18 17.42.18.jpg 
Views:	49 
Size:	1.72 MB 
ID:	250379


    Click image for larger version. 

Name:	2017-01-11 20.30.16.jpg 
Views:	64 
Size:	2.66 MB 
ID:	250380

    This is a picture of my best friend, Jacob, who at the time of this picture was still the owner of this hunk. He and I spent several nights taking it apart which ended up being the worst decision I made throughout the entire build. In my defense, I thought I was going to put it back together myself at the time. Looking back now, it would have been significantly faster if I had shipped the entire bike to YPM and let them take it apart and rebuild it. I moved to a new house during the process so there were several parts that were lost and in some cases so corroded that we could not tell what they were. Future machines will be shipped to YPM complete and the entire process will be done there.

    Click image for larger version. 

Name:	2017-01-11 19.31.26.jpg 
Views:	40 
Size:	2.24 MB 
ID:	250381 Click image for larger version. 

Name:	2017-01-11 20.30.32.jpg 
Views:	39 
Size:	2.43 MB 
ID:	250382

    The swingarm bolt was an absolute nightmare to remove. We heated it up with a butane torch and hit it with a sledge for an hour or two before it finally came out. Needless to say it was not usable.

    Click image for larger version. 

Name:	2016-11-02 08.06.26.jpg 
Views:	36 
Size:	2.14 MB 
ID:	250383

    I noticed this when I bought it but didn't know what it was. I mentioned earlier that it was mechanically impossible for the bike to run. We found the crank broke at the woodruff key insert causing the flywheel to never be properly in time. Moreover, someone used the wrong nut on the crankshaft and it ground through the stator cover. When I got it, the woodruff key was ground into bits. The flywheel and mismatched nut had exploded through the stator cover.

    Click image for larger version. 

Name:	2017-01-11 21.34.25.jpg 
Views:	40 
Size:	2.04 MB 
ID:	250384

    At the time I wasn’t sure what problems exactly, but I knew we were going to have problems with the swingarm as you can see in the above picture. You can also see a sleeve on the axle that was welded on only on one side. We ended up replacing the axle and the swingarm. This was an interesting thing because after we got the new axle in YPM realized that sleeve still had to be removed to get the sprocket hub off.

    Click image for larger version. 

Name:	2017-04-19 17.54.06.jpg 
Views:	35 
Size:	1.62 MB 
ID:	250386 Click image for larger version. 

Name:	2017-11-05 20.43.20.jpg 
Views:	39 
Size:	1.43 MB 
ID:	250385 Click image for larger version. 

Name:	2017-10-26 21.43.00.jpg 
Views:	38 
Size:	2.70 MB 
ID:	250387

    He ended up cutting the axle, which after a phone call that night from him sounded like it was not very fun! But, the new one looks great!


    Click image for larger version. 

Name:	2017-11-07 22.50.00.jpg 
Views:	37 
Size:	1.77 MB 
ID:	250388 Click image for larger version. 

Name:	unnamed (8).jpg 
Views:	26 
Size:	307.2 KB 
ID:	250418 Click image for larger version. 

Name:	unnamed (9).jpg 
Views:	28 
Size:	101.5 KB 
ID:	250419

    We replaced the swingarm with a 2nd generation 250R OEM swingarm. That means 1983 or 1984 right? WRONG! We bought an ’84 swingarm and skid plate, cleaned them up, had them powder coated and then, and only then realized that and ’83 and ’84 swingarm are totally different when it comes time to mount them to the bike due to the different shock linkages. It’s a very subtle yet important difference. So, learn from us if you are building a 2nd generation 250R make sure that the parts you are using are the same for both years otherwise buy the exact year model you need. We ended up finding an ’83 swingarm and all was well, until we realized we had to get an ’83 skid plate too!


    Click image for larger version. 

Name:	2017-01-18 20.35.49.jpg 
Views:	26 
Size:	2.36 MB 
ID:	250389 Click image for larger version. 

Name:	2017-01-18 20.35.55.jpg 
Views:	22 
Size:	2.18 MB 
ID:	250390 Click image for larger version. 

Name:	2017-01-18 20.36.00.jpg 
Views:	21 
Size:	2.25 MB 
ID:	250391 Click image for larger version. 

Name:	2017-01-18 20.36.08.jpg 
Views:	20 
Size:	2.21 MB 
ID:	250392

    YPM started with the most important, and in my opinion most impressive part of this ATC, the motor. The 300r Hondaline top end needed a major dose of TLC so we decided to call in one of the best in the business, Rob Selvy. The motor in itself is a major evolution of the 2nd generation design.

    Click image for larger version. 

Name:	2017-05-15 21.35.27.jpg 
Views:	49 
Size:	239.5 KB 
ID:	250394 Click image for larger version. 

Name:	2017-05-15 21.35.12.jpg 
Views:	49 
Size:	252.4 KB 
ID:	250395 Click image for larger version. 

Name:	2017-05-15 21.35.04.jpg 
Views:	50 
Size:	218.4 KB 
ID:	250396 Click image for larger version. 

Name:	2017-05-15 20.08.43.jpg 
Views:	48 
Size:	1.24 MB 
ID:	250397 Click image for larger version. 

Name:	2017-04-22 20.45.52.jpg 
Views:	48 
Size:	1.32 MB 
ID:	250398 Click image for larger version. 

Name:	IMG_3138.JPEG 
Views:	40 
Size:	669.3 KB 
ID:	250399 Click image for larger version. 

Name:	IMG_3925.JPG 
Views:	49 
Size:	657.6 KB 
ID:	250400 Click image for larger version. 

Name:	unnamed (22).jpg 
Views:	54 
Size:	44.0 KB 
ID:	250405 Click image for larger version. 

Name:	unnamed (24).jpg 
Views:	52 
Size:	61.9 KB 
ID:	250406 Click image for larger version. 

Name:	unnamed (28).jpg 
Views:	51 
Size:	103.0 KB 
ID:	250407 Click image for larger version. 

Name:	unnamed (29).jpg 
Views:	51 
Size:	166.2 KB 
ID:	250408 Click image for larger version. 

Name:	unnamed (16).jpg 
Views:	46 
Size:	564.3 KB 
ID:	250409

    Click image for larger version. 

Name:	IMG_3907.JPG 
Views:	44 
Size:	58.9 KB 
ID:	250401 Click image for larger version. 

Name:	IMG_3916.JPG 
Views:	43 
Size:	169.2 KB 
ID:	250402 Click image for larger version. 

Name:	IMG_3908.JPG 
Views:	36 
Size:	41.0 KB 
ID:	250403 Click image for larger version. 

Name:	IMG_3213.JPEG 
Views:	36 
Size:	682.2 KB 
ID:	250404

    Click image for larger version. 

Name:	2018-01-14 20.37.33.jpg 
Views:	49 
Size:	1.80 MB 
ID:	250393

    Crank: Welded and CNC’d to “full circle”
    Rod: Stock
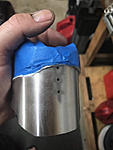
    Piston: Custom from L.A. Sleeve
    Cylinder: Custom Race Port, Bored, Chamfered
    Head: Ground and CNC’d for high temp o-rings
    Exhaust Flange: CNC’d for high temp o-rings and TRX 250R 3 ring flange
    Carburetor: TMX Mikuni 41.5 taper bore
    Fuel: 110+ Octane


    Click image for larger version. 

Name:	unnamed (18).jpg 
Views:	34 
Size:	482.7 KB 
ID:	250410 Click image for larger version. 

Name:	unnamed (20).jpg 
Views:	31 
Size:	485.2 KB 
ID:	250411 Click image for larger version. 

Name:	unnamed (21).jpg 
Views:	32 
Size:	503.2 KB 
ID:	250412 Click image for larger version. 

Name:	unnamed (15).jpg 
Views:	32 
Size:	538.8 KB 
ID:	250413 Click image for larger version. 

Name:	unnamed (14).jpg 
Views:	31 
Size:	531.2 KB 
ID:	250414 Click image for larger version. 

Name:	unnamed (13).jpg 
Views:	28 
Size:	565.3 KB 
ID:	250415 Click image for larger version. 

Name:	unnamed (12).jpg 
Views:	29 
Size:	454.6 KB 
ID:	250416 Click image for larger version. 

Name:	2017-03-08 21.14.47.jpg 
Views:	32 
Size:	1.95 MB 
ID:	250417

    The frame and other various metal parts were all sent to Gateway Powder Coating in St. Louis. Mark Eckmann and Alex Wilson at Gateway did a tremendous job getting the exact colors we wanted. YPM suggested this color scheme to me and I have to admit he certainly knew what he was talking about when he told me I would love it. The frame is Columbia Powder super mirror red, black is Cardinal BK08 and white is Cardinal WH485.

    Click image for larger version. 

Name:	2017-08-15 09.42.59.jpg 
Views:	31 
Size:	784.0 KB 
ID:	250421 Click image for larger version. 

Name:	2017-08-15 09.43.01.jpg 
Views:	30 
Size:	316.8 KB 
ID:	250422 Click image for larger version. 

Name:	2017-12-03 18.57.04.jpg 
Views:	33 
Size:	2.59 MB 
ID:	250420

    The seat was sent to Tammy Mosher at Cosmic Quads. She nailed it with matching the frame and topped it off with a black gripper and perfectly aligned 300r labels on both sides. Tammy also created the custom SELVY bar pad for us. I will have to get pictures of the bar pad later. This is a very nice touch to the bike. I would highly recommend sending using Tammy for any upholstery needs you have on your trike!


    Click image for larger version. 

Name:	2017-12-25 19.29.15.jpg 
Views:	33 
Size:	1.04 MB 
ID:	250423 Click image for larger version. 

Name:	2017-12-25 19.29.31.jpg 
Views:	29 
Size:	1.09 MB 
ID:	250424 Click image for larger version. 

Name:	2017-12-25 19.29.25.jpg 
Views:	28 
Size:	960.3 KB 
ID:	250425

    The fenders are Sundhal style low-pro fenders produced by Wikid Fabrication. They are carbon fiber fiberglass fenders. These are white gelcoat and the number plates are raw finish black carbon fiber. You can contact Jason Tetz at Wikid if you would like to have a set made for your trike!


    Click image for larger version. 

Name:	2017-12-18 22.40.46.jpg 
Views:	34 
Size:	2.25 MB 
ID:	250426 Click image for larger version. 

Name:	unnamed.jpg 
Views:	34 
Size:	320.0 KB 
ID:	250427 Click image for larger version. 

Name:	2017-11-02 17.25.20.jpg 
Views:	29 
Size:	2.75 MB 
ID:	250428 Click image for larger version. 

Name:	unnamed (3).jpg 
Views:	61 
Size:	530.6 KB 
ID:	250429 Click image for larger version. 

Name:	unnamed (6).jpg 
Views:	36 
Size:	473.5 KB 
ID:	250430 Click image for larger version. 

Name:	unnamed (27).jpg 
Views:	32 
Size:	186.0 KB 
ID:	250431 Click image for larger version. 

Name:	unnamed (26).jpg 
Views:	36 
Size:	186.0 KB 
ID:	250432 Click image for larger version. 

Name:	unnamed (11).jpg 
Views:	32 
Size:	454.8 KB 
ID:	250433

    All of the other major components of the bike were completely rebuild by YPM. If it could be rebuilt, YPM rebuilt it. If it could not, we tried to find an OEM replacement that could be rebuilt. If that absolutely was not an option, we bought aftermarket or custom.

    The frame had to be fixed and welded in a few spots from its previous hard life. YPM was able to fix it perfectly before Powder Coating. The brake calipers and master cylinders were all rebuilt and powder coated. The original clutch perch with parking brake was rebuilt, polished, and YPM even sourced the original parking brake sticker. The brake perch was also original to the bike and rebuilt and polished. The triple trees were sanded, polished and re-used. The forks were also original to the bike but were completely rebuilt with progressive springs. The front wheel was original to the bike and is the only thing on the entire bike that was not touched. Believe it or not, that is the same tire that came on the bike when I got it. It is a Kenda Front Max. The rear wheels however were replaced with Alba Racing beadlock wheels. The beadlock rings were powder coated to match the frame. The rear wheels are 18” holeshots.
    All hardware was sent to Cody Gary in Texas for replating. All the way from the swingarm linkage and axle all the way down to every last nut and bolt were blasted and nickel plated for longevity.
    [Insert Pictures of cleaned parts before and after]

    The forks were original to the bike but YPM completely rebuilt them with progressive springs. The rear shock is the original to the bike, but, was sent to Seth Fligge (SF Racing) for a complete rebuild with a PEP heart transplant and new spring. The front and rear suspension is set up for a 230lb rider with gear. This setup feels like any modern bike you can buy today. To me it is the biggest difference in the before and after. I never realized how ragged out 30+ year old suspension could really be until I sat on this trike for the first time after the rebuild. The bushings for the swingarm were made by Brian Melugin (BKM on 3WW) out of delrin.

    The handlebars were replaced with Renthal bars. The grips are ODI Rogue lock on grips. A TTO temperature sensor was installed on the handlebars to keep an eye on the beast. A Pro Armor kill switch tether is mounted just below the bar pad. Braided red brake lines are used on front and rear and the clutch cable is from Hel in England.

    The air box air feed through the frame was sealed off. That portion of the frame was customized and welded shut. We believe it was likely done long ago to accommodate the large carburetor that was being run. But, since I received the bike with no carburetor I will never know for sure. Since the massive 41.5mm carburetor barely fits, I have to believe this was the reason. Being that we could not get air the way the bike was designed and knowing we really wanted to run a lid for protection and for proper air intake control we turned to EHS Racing. We sent them our lid and they created a custom pre-filter for us. Even though you can’t see it unless you take the seat off, I love this part of the bike! It looks totally awesome! And, the best part is it functions wonderfully.

    Click image for larger version. 

Name:	2017-12-21 18.56.07.jpg 
Views:	49 
Size:	2.84 MB 
ID:	250434

    After receiving the motor parts back, YPM proceeded to have everything powder coated or polished and began putting the beast together. I was able to go spend a weekend in St. Louis at Yaeger Performance during the finishing touches. He had already sent me videos of the initial start but when I got there and we cranked it up I couldn’t help but smile. Over a year of spending money and waiting finally paid off as the Dragon roared and breathed fire right before my eyes. I couldn’t wait to get it home and get some seat time!

    Stay tuned for my first ride review. We are working on a video that will feature the entire build in video form (interviews with several involved with the build) and ride footage.
    Last edited by brandonlowe2; 02-19-2018 at 12:44 PM.
    1983 Selvy 300R - Check out the Build Thread
    1985/86 Tri-Z - Build Thread Coming Soon
    1985 Tri-Z
    1986 250sx
    1985 ATC70
    1985 ATC 200M

    Youtube Channel "Lowe Off Road"

    - Brandon

  2. #2
    brandonlowe2's Avatar
    brandonlowe2 is offline At The Back Of The Pack Arm chair racerAt the back of the pack
    Join Date
    May 2016
    Location
    Georgia
    --
    412
    Here are more pictures that would not fit in the first post.

    Click image for larger version. 

Name:	IMG_1665.JPG 
Views:	26 
Size:	709.1 KB 
ID:	250435 Click image for larger version. 

Name:	2017-12-05 21.13.13.jpg 
Views:	25 
Size:	2.09 MB 
ID:	250436 Click image for larger version. 

Name:	2017-11-05 20.43.43.jpg 
Views:	24 
Size:	2.33 MB 
ID:	250437 Click image for larger version. 

Name:	2017-08-18 15.37.14.jpg 
Views:	25 
Size:	690.1 KB 
ID:	250438 Click image for larger version. 

Name:	2017-03-08 21.13.45.jpg 
Views:	26 
Size:	1.06 MB 
ID:	250439

    Click image for larger version. 

Name:	selvy_logo_D.jpg 
Views:	28 
Size:	1.61 MB 
ID:	250440

    Click image for larger version. 

Name:	2017-12-13 20.28.39.jpg 
Views:	24 
Size:	1.45 MB 
ID:	250442 Click image for larger version. 

Name:	2017-11-17 14.20.11.jpg 
Views:	35 
Size:	1.96 MB 
ID:	250443


    Difference in '83 and '84 swingarm

    Click image for larger version. 

Name:	2017-11-14 20.09.02.jpg 
Views:	37 
Size:	1.93 MB 
ID:	250444 Click image for larger version. 

Name:	2017-11-14 20.09.14.jpg 
Views:	36 
Size:	2.01 MB 
ID:	250445


    Click image for larger version. 

Name:	2018-02-18 17.43.17.jpg 
Views:	35 
Size:	1.27 MB 
ID:	250446 Click image for larger version. 

Name:	2018-02-18 17.42.41.jpg 
Views:	37 
Size:	1.77 MB 
ID:	250447 Click image for larger version. 

Name:	2018-02-08 18.17.29.jpg 
Views:	38 
Size:	2.85 MB 
ID:	250448 Click image for larger version. 

Name:	2018-02-08 18.17.09.jpg 
Views:	40 
Size:	2.28 MB 
ID:	250449 Click image for larger version. 

Name:	2018-02-08 18.16.37.jpg 
Views:	41 
Size:	2.86 MB 
ID:	250450

    Click image for larger version. 

Name:	2018-02-08 18.16.17.jpg 
Views:	59 
Size:	1.84 MB 
ID:	250451 Click image for larger version. 

Name:	2018-02-08 17.50.09.jpg 
Views:	102 
Size:	1.86 MB 
ID:	250452


    I want to say a big big thanks to Yaeger Performance Machines!

    Click image for larger version. 

Name:	JPEG72_big.jpg 
Views:	33 
Size:	335.9 KB 
ID:	250441
    Last edited by brandonlowe2; 02-19-2018 at 12:43 PM.
    1983 Selvy 300R - Check out the Build Thread
    1985/86 Tri-Z - Build Thread Coming Soon
    1985 Tri-Z
    1986 250sx
    1985 ATC70
    1985 ATC 200M

    Youtube Channel "Lowe Off Road"

    - Brandon

  3. #3
    Join Date
    Jan 2010
    Location
    Sulphur Springs,Texas
    --
    1,005
    Great write up on the 300R! What a great looking trike; I'm ready for that ride video! Thanks for sharing Brandon.
    • 1985 Honda 250SX
    • 1985 Honda 350X
    • 1985 Honda 350X
    • 1986 Honda 250R


    “I Love The 350x. It’s So Bad”

    My Feedback Link!

  4. #4
    brandonlowe2's Avatar
    brandonlowe2 is offline At The Back Of The Pack Arm chair racerAt the back of the pack
    Join Date
    May 2016
    Location
    Georgia
    --
    412
    thanks Hondatcs! I am looking forward to getting the video done as well... trying to make it something fun to watch.
    1983 Selvy 300R - Check out the Build Thread
    1985/86 Tri-Z - Build Thread Coming Soon
    1985 Tri-Z
    1986 250sx
    1985 ATC70
    1985 ATC 200M

    Youtube Channel "Lowe Off Road"

    - Brandon

  5. #5
    Join Date
    Mar 2009
    Location
    new england
    --
    1,391
    Wow, what a beauty

  6. #6
    Join Date
    May 2016
    Location
    OH Canada
    --
    1,102
    Great write up!!!!
    A lot of time and $$$ went into that. Very nice.
    -------------------------------------------------------------------------------------------------------------------------------------------------------------------

    '83 200X

    Chicks love guys that ride trikes

  7. #7
    brandonlowe2's Avatar
    brandonlowe2 is offline At The Back Of The Pack Arm chair racerAt the back of the pack
    Join Date
    May 2016
    Location
    Georgia
    --
    412
    Thanks plastikosmd and Rob Canadian! And yes much dinero was spent on this one lol


    Sent from my iPhone using Tapatalk
    1983 Selvy 300R - Check out the Build Thread
    1985/86 Tri-Z - Build Thread Coming Soon
    1985 Tri-Z
    1986 250sx
    1985 ATC70
    1985 ATC 200M

    Youtube Channel "Lowe Off Road"

    - Brandon

  8. #8
    Join Date
    Jul 2009
    Location
    South Florida
    --
    6,725
    Awesome job !!!!!!!!!!
    78 atc 90/180cc Dickson Full Suspension
    76 ATC90/180cc Nicholson
    77 atc 90 Dickson Full Suspension
    84 KLT 110/123cc Powroll Racer from 80s
    87 atc 125m stock
    84 atc 200x Curtis Sparks
    84 atc 200x Powroll My race bike from 80's
    83 atc70/108cc Powroll blue Xmas Special
    81 atc185s HP-ATC full suspension

    Performance Shop is Open PM me for Service

    My Feedback http://www.3wheelerworld.com/showthr...ck+shortline10

  9. #9
    Footy's Avatar
    Footy is offline At The Back Of The Pack Arm chair racerAt the back of the pack
    Join Date
    Feb 2015
    Location
    Charlotte, N.C.
    --
    300
    Wow! Beautiful!
    Put your butt on the inside fender or end up on the ground!

    TRX450ER
    ATC250SX
    ATC350X
    ATC110
    ATC185S
    XR100R
    CRF230F
    Raptor 125
    Breeze 125
    Grizzly700

  10. #10
    Arky-X is offline Just Too Addicted Arm chair racerJust too addicted
    Join Date
    Feb 2017
    Location
    Arkansas
    --
    529
    Me saying "very nice" would be an understatement so that thing is damn nice!

  11. #11
    Join Date
    Mar 2013
    Location
    Baldwin, Wi
    --
    603
    Incredible build!!!!! Is it still 300cc's? Why keep the gold front wheel? Is there a matching beadlock in the works?
    85 Tri-z Power valve on Inverts
    85 Tri-z Basket Case
    01 gsxr750 engine/Tri-z frame (long long way from complete)

  12. #12
    brandonlowe2's Avatar
    brandonlowe2 is offline At The Back Of The Pack Arm chair racerAt the back of the pack
    Join Date
    May 2016
    Location
    Georgia
    --
    412
    Quote Originally Posted by NeverLift View Post
    Incredible build!!!!! Is it still 300cc's? Why keep the gold front wheel? Is there a matching beadlock in the works?
    No beadlock in the works for the front. Wasn’t sure how to find such a thing.

    We thought the gold was a nice touch and tied the front end to the gold chain on the back


    Sent from my iPhone using Tapatalk
    1983 Selvy 300R - Check out the Build Thread
    1985/86 Tri-Z - Build Thread Coming Soon
    1985 Tri-Z
    1986 250sx
    1985 ATC70
    1985 ATC 200M

    Youtube Channel "Lowe Off Road"

    - Brandon

  13. #13
    Join Date
    Oct 2003
    Location
    Las Vegas, NV.
    --
    2,452
    Yes, I agree. Beautiful outcome on this!
    Red Rider's Sand Machine Updated 07/23/14

  14. #14
    Join Date
    May 2006
    Location
    The Open Road
    --
    4,729
    Fantastic build

    Best looking 2nd gen I've ever seen. I sure it runs been better than it looks

    Sent from my Z958 using Tapatalk

  15. #15
    Join Date
    May 2006
    Location
    The Open Road
    --
    4,729
    Quote Originally Posted by brandonlowe2 View Post
    Click image for larger version. 

Name:	2016-12-07 20.35.59.jpg 
Views:	88 
Size:	1.54 MB 
ID:	250376
    So what the actual F@#$ is this mess? Vice jaw marks?


    Sent from my Z958 using Tapatalk

//ArrowChat Integreation Code //