
Very very nice.

 The purveyor of "Plan B"
Teaching quads a lesson
The purveyor of "Plan B"
Teaching quads a lesson
Very very nice.
"Yes its broken, but does that really surprise you?."
"What happened? What does it look like happened?!?!"
Power User
Catch me if you can
This one is up for sale.
https://www.ebay.com/itm/Ktm-3-wheel...53.m1438.l2649
I'd love to peek under the hood so to speak. It looks pretty enough on the outside, but I'm trying to figure out how he dealt with the upper shock mount and air filter, but he didn't put up any photos aside from what he had on Instagram.
A little bling. These will go on the non-sand wheels that will be polished aluminum. Should interchange with the Tri-Z.
It sucks to get old
Power User
Catch me if you can
After many hours of contemplation i started cutting metal for one of the intake sections on Friday. It’s a major pita as there is almost no acsess to the area to measure and the transitions are from rectangles to circles at compounded angles. As an added bonus I suck at math, so everything was planned out with chalk and a Sharpie.
Try not to laugh when I admit that what you see so far represents over 10 hours of cutting, welding and hair pulling and I still have to make another one for the air filter.
The left hand side of the airbox is where the second section will mate with this one. I was a little concerned about restricted flow, but the rectangular section will have over 20% more area than a 38mm carb, so it should be fine.

Last edited by El Camexican; 01-07-2019 at 01:42 AM.
It sucks to get old
Power User
Catch me if you can
Cool! So in the end you can use the stock airbox??
The shock being not centered is an odd configuration, but I've seen it many times on other models.
I guess as long as the swingarm doesn't flex, it works perfectly.
For the limiting amount of tools you've been using, you've done an AMAZING job!! I can't wait until it's done, you must be psyched she's on 3 wheels now!!
All our government does is distract us while they steal from us, misspend our tax $ and ruin our country
Power User
Catch me if you can
Yes I will be able to use the area that the ATV uses for an air box, but not the ATV filter. I’m stuck using a foam pod filter inside the box and if I get lucky there will still be room for a tool bag. If you look at the top of the last photo you’ll see a U or trench in the plastic. This is where an oval shaped duct runs from the carb, under the gas tank and into the air box on the ATV. I assume the ATV filter box sits on the rail that runs around the perimeter of the opening.Originally Posted by Dirtcrasher

Because of the difference between the bike tank and frame VS the ATV parts I can’t use that channel to get from the carb to the air box, so I’m coming in from the side as that’s the only place there is enough room to get around the shock.
Hopfully the swing-arm is strong enough to handle the offset. I added a plate inside the boxed section to help reinforce it. If you’ve ever looked at an 80’s ATK swing-arm, mine is nowhere near that far off center, not even 2”.
And yes I’m pumped to see it on three. Had to toss the motor in to work on the carb ducting and that gave me a chance to try kicking it over. It does clear the fender, but I’ll have to be conscious of every kick in order not to scuff the plastic. In hindsight I should have tried to set the fenders back another 2”. This would have lowered the seat height and added clearance, but I’m not convinced I’d have still been able to adapt the narrower section of the bike seat to match the tank, so I’m not going to beat myself up over it.
I’m really happy with the position of things as they sit. The foot pegs are only 1/2” further from the center of the steering stem than they are on my Tri Z and the trail looks like it will end up at less than 2-1/2”. Rake will be around 27 degrees.
The only things I’m not thrilled with are the seat height and ground clearance, but I can accept that without seriously modifying the frame i’ll Have to live with them. I plan to publish all the specs when it’s done.
Last edited by El Camexican; 01-08-2019 at 01:46 AM.
It sucks to get old
Got The Holeshot
Arm chair racerJust too addicted
I was concerned about my seat height on my 450 build also, but after putting it through its paces it turned out to be a non issue. The suspension is so plush that the ride height squats quite a bit.
YAMAHA 450 HYBRID
85 350X- RED
85 350x -BLACK
86 350x-WHITE (with Goki)
85 250r
83 atc 70
84 atc 70
84 atc 110
09 yfz 450
2006 Arctic Cat Prowler
RZR XP 900
Aspiring romance novel cover model, and the Official 3WW slayer of thieves and swindlers.
Catch me if you can
The ATK didn't have two feet of axle on either side of it for leverage either, lol. Honestly I don't think the offset shock will be of any concern.
85 Tri-Zinger 60
85 ATC250SX
86 ATC250SX
87 ATC250SX
02 XR650L conversion
84 ATC 480R
Power User
Catch me if you can
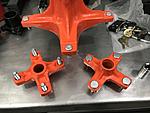
Decided it was time to stop forking around and finish the front end. Had some seeping on another bike and a spare set of unknown condition, so I decided to get it all over with at once. Such a dirty job I’d rather get it over with, cleanup and hope I never have to do it again.
The outer tubes are out for anodizing, so there’s a little time to work on the bling.

It sucks to get old
Wires, Hoses, & Digital Wizardry.
Got the holeshot
I don’t blame you on delaying this chore. It’s easy to do, but messy, and I despise it as well. Even after the job is done, you’ll be smelling that nasty fork oil for weeks to come. Looking awesome though. Sorry about the extra work on the airbox setup.
Red Rider's Sand Machine Updated 07/23/14
At The Back Of The Pack
Arm chair racerFirst time rider
Nico, I'm so envious of how clean your shop is. My shop even on it's best day probably isn't as nice as yours on it's worst.
Power User
Catch me if you can
Worked on the fork internals this weekend, drilling holes, changing shims, freeing up corroded valves and shortening springs. The fork length will be 1.40” less than stock.
Before anyone confuses me with someone who knows anything about altering suspensions, let me confess to copying a set that Slavens Racing did for me years ago that I really like the feel of.
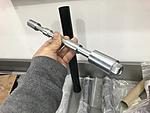
Also got the fork legs, rim and axle back from the platers this evening.
It sucks to get old
Power User
The day begins with 3WW
Is that nickel plating or just a really good looking zinc job on that axle?
Sent from my Z958 using Tapatalk
Power User
Catch me if you can
Just electroplated zinc on polished high quality (I hope?) steel.
I think I have the zinc thing down pat now. For new stuff I wet sand with at least 600 grit and degrease. For used hardware I soak them in thinner, wash them with dish soap and brush or sand them until I get all the grease off and then soak them in a mix of diluted muriatic acid for about 15 minutes. Then neutralize the mix with backing soda and rinse the parts with water.
The key after that is to keep the flash rust from forming which isn’t hard on a sunny weekend day when I can dry them with a rag and leave them in the sunlight, but when I do it at night I can’t seem to dry them fast enough and you can tell the finish isn't as smooth and bright on those.
In theory the plater should strip all the nasty off as part of the process, but after a dozen separate batches I’ve realized that grease, thread locker, paint and rust don’t come off 100% of the time and that the results are always better if you bring them a clean product.
In other news I'm a little disappointed with the anodizing. It's dull and I was expecting it to shine. The guy tells me that they didn't buff them after they stripped the old coating and that's why their dull. I wish they would have asked my preference, but on the upside I may have the only matt black WP forks in the world.
It sucks to get old
Power User
Catch me if you can
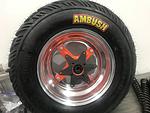
Got the spare wheel back today. They coated the polished rim with the same coating that the factories put on their alloy rims, so according to then it won’t chip or yellow and I never have to polish it. If it holds up I plan to coat a lot more items with this. It’s almost as shiny as freshly buffed aluminum, but no less shiny that week old buffed aluminum.
It sucks to get old
Power User
Catch me if you can
Got the forks put together and installed the complete front end to see where I’m at with the some of the geometry.
The top of the steering nut is 3/4” lower than my Tri-Z and the back of the seat is the same height. However, the Tri-Z seat has a 2” dip in the center and the KTM has the modern almost flat profile putting my butt 2” higher than the Yamaha when seated. The distance from the pegs to the top of the seat is even more pronounced ant almost 4” more on the KTM.
As it sits in the photos it has 9.5” of ground clearance and that can be moved up as much as 2.5” fairly easily if needed. That 1.5” less than the Yamaha at the moment. I ordered another ATV seat to see if it might be possible to lower the seat another 2” using a different method of mounting the seat and fenders. That would totally screw up the work that I’ve done on the air induction up to this point, so I’m putting that on hold until I get my hands on the seat and see what might, could be done.

It sucks to get old


 Reply With Quote