//ArrowChat Code
Page 4 of 9 FirstFirst ... 2 3 4 5 6 ... LastLast
Results 46 to 60 of 129

Thread: Mailman delivered my new 200x “motor” today

  1. #46
    Join Date
    Aug 2016
    Location
    East of Worcester ma
    --
    1,324
    I tell ya, this thing is adding up in cost—from master switches, regular on/off switch, amp/volt meter, reverse/forward switch, voltage shunt for meters, fuse block with voltage reg for lights- just ordered a motor controller from London, controller watertight box also ordered, Assortment of wire/pigtails.....
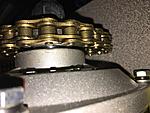
    Also need to order one of those fancy x-ring chains (less chain noise)
    Super excited to see what I end up with still though


    Tires/rims are coming today
    Still need to figure motor mounting- think I gotta plan for that
    Edit:
    Tires mounted/
    A little over inflated right now/ waiting on two small areas of bead to pop
    Click image for larger version. 

Name:	46795DB2-818E-4BE3-BB9F-3065BE166D23.jpeg 
Views:	37 
Size:	1.83 MB 
ID:	255263 Click image for larger version. 

Name:	9EBC1765-A0AD-448F-854B-D874293F4552.jpeg 
Views:	44 
Size:	2.93 MB 
ID:	255264

    Edit again: just a pic of other parts either cleaned up or new for this project
    Click image for larger version. 

Name:	45CF52E0-BC57-4A7E-AF44-0E33B3A1AB49.jpg 
Views:	26 
Size:	1.80 MB 
ID:	255339 Click image for larger version. 

Name:	65D37EFE-B58C-48AA-8A20-89835500EF3C.jpeg 
Views:	21 
Size:	2.75 MB 
ID:	255478 
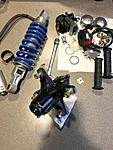
I bought a nice rim that came with the tire already mounted that’s in great shape so that’s what I’ll go with....
    Shock may need to be rebuilt- not sure yet...it’s been on my shelf for a few yrs.

    Edit:more pics
    Still waiting on amp/volt display - three way toggle for three speed option- and reverse switch button. I’m going to purchase 5 “cheap” 12v 12ah batteries just for testing... before a big lithium battery is bought.
    Click image for larger version. 

Name:	E7D06293-D62B-4492-9096-4773B74A0F02.jpeg 
Views:	28 
Size:	2.84 MB 
ID:	255533 Click image for larger version. 

Name:	BD4699D8-8B8F-4DCB-A039-D6BFD94ACC7E.jpeg 
Views:	17 
Size:	2.08 MB 
ID:	255534 Click image for larger version. 

Name:	0DB9F7A2-DA62-425D-98A3-4CABB934F974.jpg 
Views:	21 
Size:	104.9 KB 
ID:	255535

    ——— two weeks later—— I’m “still” gathering parts
    Still need or ordered-50 amp breaker/fuses holders. Batt wire/ small misc stuff. But almost ready to bench test motor.
    Still gotta modify the frame, kinda looking forward to it but wish I could do it in the living room....
    Click image for larger version. 

Name:	CD9A8FAB-5D95-44FD-B4BC-6C48F2ECB4F9.jpeg 
Views:	22 
Size:	2.67 MB 
ID:	255833
    Gotta pause my hobby spending $ for x-mas present buying though.
    I’ll add a new post when I actually have something put together.
    Shep
    Last edited by Shep1970; 12-01-2018 at 10:13 AM. Reason: Info/pics/spelling

  2. #47
    Join Date
    Aug 2016
    Location
    East of Worcester ma
    --
    1,324
    I wasn’t planning on making a new post until I had the frame done oh well, So anyway I know that the China brake pads are junk!!!! But I have had no issues at all with the China rear calipers themselves. So off to eBay and I buy one of those $80
    Dollar China Honda 200x front calipers (bad move) oh well. It shows up and looks good then I start searching eBay to see what this caliper was originally intended for- not 5 minutes go by and come across the “GY6” scooter front calipers and guess what it’s the same damn caliper....... for less that 30 bucks.
    So I buy one to compare and it’s identical to the one that was 80+ shipping....(I bought a Chrome one for $29)
    I have pics but already removed the tire- will load them in a few mins.

    Click image for larger version. 

Name:	343C146C-10E1-4B23-A9F5-92D72A60B5F9.jpeg 
Views:	23 
Size:	2.48 MB 
ID:	256016 Click image for larger version. 

Name:	2F5F8A00-B19C-4006-8512-172A87A15B5D.jpeg 
Views:	20 
Size:	2.39 MB 
ID:	256017 Click image for larger version. 

Name:	A0D3F304-C674-46E6-A7C0-75811463965F.jpeg 
Views:	22 
Size:	2.15 MB 
ID:	256018 Click image for larger version. 

Name:	8EAF88B2-F279-434E-8C8F-4913EC6448BA.jpeg 
Views:	20 
Size:	1.91 MB 
ID:	256019 Click image for larger version. 

Name:	599AD0C7-FAD6-462A-9179-D2693BAB4F09.jpeg 
Views:	20 
Size:	2.81 MB 
ID:	256020 Click image for larger version. 

Name:	A5123BBF-D020-43E9-8B52-B1747EC2D14D.jpg 
Views:	19 
Size:	93.9 KB 
ID:	256021
    Click image for larger version. 

Name:	EBE98D72-7241-4B92-8490-FCDA709108BD.jpeg 
Views:	21 
Size:	1.75 MB 
ID:	256022
    Had to use the oem bracket though
    I know oem caliper is better but I didn’t have one and eBay used/and most likely a rebuild needed are not cheap either so opted to go this route.

    Shep
    Last edited by Shep1970; 12-07-2018 at 01:22 AM.

  3. #48
    Join Date
    Apr 2012
    Location
    USA
    --
    4,114
    Not sure how I missed this build. Full electric machines will likely be the future assuming battery tech continues to improve. Ligher and more power stored in smaller and smaller areas will make full electric bikes/cars etc much more popular.

    I was looking into an electric super tiny pickup like a VW Caddy, but never had to funds for all the required parts.

    I didn't get a chance to read the whole thread so far, does the motor controller support regeneration for deceleration? Being an off road machine, assuming you have a lot of hills around, you might extend the range for your batteries by a fair amount with a regen system.

    Anyway subbed for the build. Good luck with the project.

  4. #49
    Join Date
    Aug 2016
    Location
    East of Worcester ma
    --
    1,324
    Quote Originally Posted by ps2fixer View Post
    Not sure how I missed this build. Full electric machines will likely be the future assuming battery tech continues to improve. Ligher and more power stored in smaller and smaller areas will make full electric bikes/cars etc much more popular.

    I was looking into an electric super tiny pickup like a VW Caddy, but never had to funds for all the required parts.

    I didn't get a chance to read the whole thread so far, does the motor controller support regeneration for deceleration? Being an off road machine, assuming you have a lot of hills around, you might extend the range for your batteries by a fair amount with a regen system.

    Anyway subbed for the build. Good luck with the project.
    Yes, the controller does the regeneration braking function but I’ll leave it turned off until I read more about it, (Less wiring) for now too.
    I think I’ve got all my switches- just waiting on a 60-72v electrical contactor (high power switch that can be turned on/offw/low voltage)
    Had to go buy a soldering iron and good wire crimpers/strippers.
    I bought an electric atv wire harness (cheap) mostly just for the correct end plugs.
    These things “Should” set me in the right direction
    It’ll be a learning experience anyway.........
    Click image for larger version. 

Name:	2E864E3A-7CBF-4859-90B7-54136566ED77.jpeg 
Views:	16 
Size:	2.19 MB 
ID:	256138 Click image for larger version. 

Name:	4E4E09EE-DC76-4690-971A-571D97D40E04.jpg 
Views:	13 
Size:	1.53 MB 
ID:	256139

    Shep
    The two wires on front master cylinder shuts the motor power down: and brake light- (yes just a China master)
    Last edited by Shep1970; 12-14-2018 at 10:38 AM.

  5. #50
    Join Date
    Apr 2012
    Location
    USA
    --
    4,114
    Hopefully the cheap harness you bought wasn't made in China, they have the worst wire and crimps I've ever seen. I could pull some pins from parts I have to show examples if needed. Their terminals are thinner too, so can handle less less amps.

    When I first got into harness building, I bought all my supplies from http://cycleterminal.com/ The site is a bit of a funky layout (the left navigation bar changes as you click categories). It looks like you mainly have bullet terminals, and 110 Sumitomo MTW series connectors on the harness in the photo. 3.5mm bullet terminals are typical on Honda harnesses, other brands commonly used the 3.9/4mm size. Larger one of course supports more amps.

    http://www.cycleterminal.com/terminal-kits.html

    If most of the wiring you're looking to build are just simple signal, relay, lighting etc, might be worth while using sealed connectors so corrosion won't ever be a problem. The 090 Sumitomo HM series seals up well, very similar shape to the 4+2 style CDI connectors.

    Anything that's higher powered, like 10 amps + should use larger terminals, the 250 (1/4in) connectors can handle quite a lot, commonly used for regulators and such.

    Also for frame grounds, and the bolt on wiring, these ring terminals would likely be what you'd want. I use the 6.4mm ones on my harnesses, even when the bolt can support a 5mm one. They are super thick, not exactly fun to crimp. The site sells crimp tools too. On their tool page, the first one (green handled) I've had since the start and use it all the time for the ring terminals and bullets. It can also be used for the 250 terminals, but I have a Japanese tool (~$100) that works well on them. Mid way down the red handled crimper works for the 090 crimps, and 110, the handles are a bit short, so you have to put a lot of effort into the crimps. I ended up buying another Japanese crimper to do the wire conductor crimp, and still use the red handled one for the seal/insulation crimp. The Japanese tool I think was fairly cheap but good crimps are a lot easier to get out of them, the only marking on it is Engineer PA-01 Wire Plier. Also near the bottom of the tools page has a nice diagram of good vs bad crimps.

    I could also make the pig tails up so you can just crimp or solder the harness together, or sells just the connector/terminals you need for a reasonable price.

    Just would hate to have electrical issues on an electrical powered bike lol. After a crimp, it's possible to solder it as well, time consuming but ensures it won't fall apart in a few years.

    Either way, good luck with the project, wiring is just my thing lol.

  6. #51
    Join Date
    Aug 2016
    Location
    East of Worcester ma
    --
    1,324
    Thank you, and thanks for the link- (Yes cheap China) harness. My plan is to have the wiring all working on a table to test/run it. (No wire lengths would be right) (just quick connections) then as I transfer to the frame/bike I’d upgrade wires/connections as i go. Well that’s the “plan” anyway......
    “as long as no-one stands in the puddle I ride through” (kidding)

    Here’s one more pic w/the “correct” hub- I had a 350x hub-the Small differences wouldn’t work w/the 200x forks. Thanx again for trading for a 86/87 hub steve. It’s all lined up great now Click image for larger version. 

Name:	6B3EAC82-D80A-4CA3-9066-E9FDE1666FFB.jpg 
Views:	21 
Size:	1.43 MB 
ID:	256148 and the wheel is centered.........

    Shep
    Last edited by Shep1970; 12-15-2018 at 10:51 AM.

  7. #52
    Join Date
    Mar 2010
    Location
    Arizona
    --
    483
    Love watching this project evolve. Here is some inspiration for you Shep. Found this:

    https://www.youtube.com/watch?v=XWbz6dvtljk
    https://bvctrikes.com/

    This thing looks like a lot of fun!

  8. #53
    Join Date
    Aug 2016
    Location
    East of Worcester ma
    --
    1,324
    That thing goes pretty good!!!! I’d like to know how much $ he’s got into the batt/motor I bet it’s close to 5-6grand just in those alone. My little 60v/1800w at some point will be upgraded to a 3000w later on. Those Alta bikes are too new at this point to find a tranny for one(with my pocket change)$. A little camp cruiser is what I’ll have, should be fun though.

    Just purchased 3-gallons of rtv silicone for a plastic tank mold, if I have enough left I will also mold a plastic engine case (empty cavity) for batteries so mud/dirt coming off the front wheel won’t cover them w/dirt. It’ll be good inside work for the cold days.
    Ive decided against lithium batts for now, so I’ve got 5- 12v,20ah lead/acid sealed agm batteries coming. After reading/watching fires/explosions utube vids about lithium I’m scared of em’. Hopefully by the end of next wk I’ll have the motor mounts roughed in. Whenever I think I have spare time my phone rings for more const work/this time of yr I can’t turn it down(seems never ending this yr.(not a bad thing)

    Shep
    Last edited by Shep1970; 01-05-2019 at 10:36 AM.

  9. #54
    Join Date
    Apr 2012
    Location
    USA
    --
    4,114
    Lithium Ion batterys are relatively safe, if they have a proper charge controller and protection circuits. Physical damage is probably the biggest risk on an ATV. Do some readying on a DIY power wall, these people take old junk laptop batteries apart for the 18650 cells, charge, test, then assemble into a battery bank. The common design is to make each "battery" a ton of cells in parrallel, so the amps increases, but voltage stays the same. They use a small fuse wire to connect one end of the cell to the bus bars, so if the battery goes bad and shorts or the leads get shorted somehow, it burns instead of the batteries going up in smoke. Then a charge controller is used to charge the batteries. I don't think they have much more for over draw protection. Ideally you'd match identical capacity and discharge rated batteries together, for a project like yours I'd assume you'd be going with all new cells.

    There's a lot of stuff out there for the DIY power packs for construction of the batteries. I suspect if you built a case around them with a mold, kind of like how a drill battery is made, you'd have the physical damage at a low risk. Be mindful the batteries do heat up a little from charging and discharging, so a way to vent them would be ideal. These little batteries can have some crazy discharge specs, like a single cell capable of 30amp peak discharge. A small pack would get you by short term, you just wouldn't have much range. If I recall correctly, some people are putting 12 of these cells together to start their car like a jumper pack, have to be careful because of the charging system on the car though, it doesn't support the Li-Ion batteries at all, I think the video I saw they had the alternator unhooked. Pretty impressive for such a small battery even though it was a smaller car engine.

    Anyway, like anything there's a trade off for risk vs benefit. The lead acids can do some bad stuff too, like when they fail, sometimes they fail in a dead short internally, make a bunch of heat and can catch fire (the gases). It's pretty rare for it to go that extreme though. Also when charging a flooded lead acid, the gases coming off the battery can be flammable.

    Knowledge is power, knowing how to deal with what you're working with is the best solution, which ever route you go with.

    Also here's a fun vid of an electric dirt bike. Not the one I saw before (was a DIY build), but this thing is pretty interesting, and keeps up with the gas powered ones just fine. He's even riding it on a limited "map" for torque to preserve the battery life. If I heard the owner right, he gets 3.75 hours mx ride time out of the bike on the highest map.

    https://youtu.be/CaCo6SWyedU?t=388

  10. #55
    Join Date
    Aug 2016
    Location
    East of Worcester ma
    --
    1,324
    Well it’s been almost 2-weeks. Just a quick update- the motor mount is roughed in, hopefully get her all welded up before the snow this wk end. It’s 5mm steel plate (just under 1/4”) it adds about 5 lbs. the top mount I’ll do in aluminum I think, it’s more for cosmetic reasons than strength. I made the mounting plate bigger than needed (front to back) I don’t want to be messin’ with half links...
    Click image for larger version. 

Name:	410F22BF-D35D-4097-BB50-18BEFD9CEB17.jpeg 
Views:	42 
Size:	1.01 MB 
ID:	256769 Click image for larger version. 

Name:	C496E347-420B-41FB-87F8-F8C58B3658E1.jpeg 
Views:	43 
Size:	2.14 MB 
ID:	256770 Click image for larger version. 

Name:	A086D6A6-575A-4952-94FF-69550831E736.jpeg 
Views:	35 
Size:	1.94 MB 
ID:	256771 Click image for larger version. 

Name:	11A1E5B7-E044-4DAA-8B6E-350280F81917.jpeg 
Views:	39 
Size:	2.08 MB 
ID:	256772 Click image for larger version. 

Name:	91B27053-243A-4080-AA8F-6CE39A051FEF.jpg 
Views:	46 
Size:	97.8 KB 
ID:	256773

    Thanks for looking,
    Shep
    Last edited by Shep1970; 01-18-2019 at 08:12 PM. Reason: Sp

  11. #56
    Join Date
    May 2006
    Location
    The Open Road
    --
    4,729
    Awesome work so far.

    This is definitely the most interesting build on here in a very long time. No offense to anyone else, but that's just my opinion. Gas powered trike stuff has been done every which way you could imagine, but this electric stuff is fascinating and it's going to be our future whether we like it or not

    Sent from my Z958 using Tapatalk

  12. #57
    Join Date
    Aug 2016
    Location
    East of Worcester ma
    --
    1,324
    Well I’m back at this project- never really stopped just haven’t posted about it. I did recieve the lithium battery the other day it weighs about 15lbs if I tried using lead acid the batteries would have weighed about 100lbs- for the same 24.5 ah rating.
    I’m mounting it under the seat I figure with no airbox it’s a nice spot, in one of the pics you can see it as green poster board but it’s going to be 1/8inch steel plate (to keep it safe from sticks/rocks) open in front/back for cooling.
    The steel plate I’m having my son bend it up at his school shop (they’ve got a nice press that’ll do it) yay...so I hope to get this project moving on it’s own very soon, (Minus fenders) I don’t have em yet. I have a seat though.
    Also I’ve gotta get some fuses and better non/China small connections.
    The steel battery tray will add about 8lbs but that’s ok, (It’s that orange plate you see).
    The battery actually has a key on/off and also locks it onto a included plate, I bought a 1/4” rubber sheet that’ll be between the battery and steel plate for a tad extra cusion.
    Oh- the battery and charger cost, ya I’m not gonna say..... it wasn’t cheap I’ll put it that way.
    The motor mount/plate has been welded in too.
    I guess that’s it for now, Click image for larger version. 

Name:	C3D667E4-EF01-455F-8B9D-F2823C37BD91.jpg 
Views:	31 
Size:	102.1 KB 
ID:	258837 Click image for larger version. 

Name:	4D30D75F-1CF8-4A3F-AFD7-BC109BF664D9.jpeg 
Views:	29 
Size:	2.76 MB 
ID:	258838 Click image for larger version. 

Name:	909A6E5B-B33C-44B1-8D00-C6D921DE188E.jpg 
Views:	33 
Size:	1.54 MB 
ID:	258839 Click image for larger version. 

Name:	D8A0EAE7-C055-4EF8-A4FF-D90BB679D9B0.jpeg 
Views:	28 
Size:	1.49 MB 
ID:	258840 Click image for larger version. 

Name:	6DD40917-1644-426B-847F-DA0BC529EB82.jpeg 
Views:	30 
Size:	407.8 KB 
ID:	258841 Click image for larger version. 

Name:	E7AF43BF-2028-4193-B770-B263B093E20B.jpg 
Views:	27 
Size:	101.3 KB 
ID:	258842

    Edit: well I’ve got the motor running. Momentary button for reverse works great, 3-speed works, key switch works like it should. I need to get the front master cylinder two wires hooked up (when braking it is a motor shut down)
    I had the battery box bent up so that’s done, Hope to get it welded in the frame this wk end. The motor sounds strong... it’s hard to explain kinda silent with a rumble.
    Ps2, chop — ignore my wiring it s getting an overhaul
    Click image for larger version. 

Name:	0226B5DC-9DEE-4F2A-A2B0-012D0293BC3E.jpg 
Views:	14 
Size:	1.31 MB 
ID:	258872

    I still need a tailight/ connections are there: 12v out of control box, headlight connection is also there just not hooked up (tested fine)
    Shep
    Last edited by Shep1970; 06-15-2019 at 07:43 AM.

  13. #58
    Join Date
    Aug 2016
    Location
    East of Worcester ma
    --
    1,324
    Progress, it’s not powder coat. An auto body shop (friends shop) down the street sprayed it for me, it’s a mixture of leftover paints they had. I told him I did not want “pumpkin” orange or safety orange this is somewhere between the two.
    I figure white tank, orange shrouds and orange headlight w/white fenders and stock decals but have orange where the red would be on the decals.
    Kinda wish I painted the swingarm white instead of silver but it is what it is...

    Click image for larger version. 

Name:	EF8403E1-F54B-4F58-94F9-7D1D94A4B4C5.jpeg 
Views:	30 
Size:	2.77 MB 
ID:	259366 Click image for larger version. 

Name:	F00A2EEA-3619-441C-9888-8445A95802DE.jpeg 
Views:	33 
Size:	2.65 MB 
ID:	259367 Click image for larger version. 

Name:	AD17FDE4-4DC7-4589-9644-DCAE57205AC3.jpg 
Views:	32 
Size:	1.66 MB 
ID:	259368
    Thanks for looking,

    Shep

    Edit: here’s a pic back inside the house-battery mounted/ on the locking plate. I need to drill 7/8”
    hole for a grommet out the front. I’m doing a (little) every day so hope to have significant progress this week. I hope....

    Click image for larger version. 

Name:	2C848836-950C-4940-995A-1A606310B106.jpg 
Views:	11 
Size:	101.5 KB 
ID:	259425
    Last edited by Shep1970; 07-26-2019 at 02:51 PM.

  14. #59
    Join Date
    Jul 2018
    Location
    TN
    --
    1,065
    You gotta incorporate a "High Voltage" emblem on this somewhere.

    Lookin' good!
    I was born and raised on Venus & I may be here a while.....

  15. #60
    Join Date
    Apr 2012
    Location
    USA
    --
    4,114
    Not a bad color of orange, unique color for a build I think, orange and white seems like it would go together well in my mind.

//ArrowChat Integreation Code //