Once you come to grips with the fact that you are going to have to do this alone, it is always recommended that you loosen any hardware that you will eventually have to take off in a less convenient position, like with your frame laying sideways on the floor.
In this instance I will be removing the low profile retaining nut on the top of the triple tree so that I can pull the bars off befor I remove the engine.

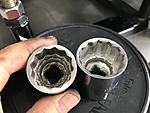
The key to not damaging a low profile nut or bolt is to just leave it alone, but if you must remove it use a socket which has been ground flat to remove the taper that normally exists to facilitate placing a socket over the head and clearing the slight radius where the hex meets the head on a normal nut.


 Reply With Quote
 I just hate to see pod filters on good looking builds, but if that's the only way it will work properly, then there is no other choice.