-
Newbie 85 Tri-Z help
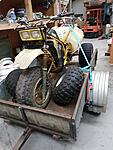
Hi all, first time posting and have a couple of question on a barn find i got, 85 tri-z. This thing had been sitting under a lemon tree for 8yrs when it was given to me. Plastics really bad and would not start. Persistence on cleaning out carb, fixed the fuel pump and cleaned out the tank, finally got her to start but the bike filled the shed with smoke. After so long sitting the seals were shot. A complete teardown with 1st o/s piston and rings, internal seals and bearings im slowly putting her back together. Plastics have been scraped and wet sanding will follow with a fresh set of decals.
Question 1: fuel petcock under the pump leaks, whats the part number for the tap seals? I can get 'all balls' products here in new zealand but if there is another option I would love to hear. Its leaking from out of yhe tap itself and bowl underneath. Looks like the previous owner had done the wrench report mods but man butchered them, fingers crossed she will run sweet after all this effort. Stock carb tho running a 390 main, boysen reeds by the looks, not stock thats for sure, swiss cheese exhaust (i have a dg in transit) I will attempt to add some pics...any help would be very much appreciated Attachment 268049Attachment 268050Attachment 268051Attachment 268052
-
Hi and welcome to the site.
I’m not aware of any part numbers for the items your looking for. I’d suggest you carefully disassemble them and take whatever’s left of the seals, or o-rings to a seal wholesaler to see if the can match you up. Just make sure they know the dimensions are metric and that the material will be in contact with fuel.
That cylinder looks like it’s been welded on both sides of the intake. Is that correct, or am I seeing something else? If that’s weld I’d be hesitant about using it. That added boost port is horrific and work they did on the other side is almost as bad. Did they do any other grinding on the cylinder?
Great job on the plastic and the rest of it. You’re going to have a very nIce trike.
Last edited by El Camexican; 08-30-2021 at 10:27 PM.
It sucks to get old
-
Looks like some good progress
The plastics look 100x better after you rehabbed them
Sent from my motorola one 5G ace using Tapatalk
-
Thanks guys...yeah i agree, horrific butcher job on the cylinder and yes been welded...i was told it's a runner but ive only been able to start it once after half an hour kicking just to fill the shed with smoke, before i did the dodgy main seals...no other signs of grinding or other head work tho...
Yes, i can take the rubber seals out of the petcock and i think I will take the pump assembly into the shop...tho the local yami dealer never herd of a tri-z...as rare as hens teeth here in NZ...
Thanks for the comments on the plastics...ive had a second thought on the rear one, found a brand new one at 'yamaha sports plaza.com' dam cheap...the old ones abit thin in places and white creases i think may be difficult to rectify...
Before i get too far ahead of myself...its becoming abit of a money pit... i really need to get her to run and break in the new piston... just to see if any other issue around those cylinder mods will cause me catastrophic problems
Will keep you'll posted with the progress and thanks again for your replies
Cheers ������
-
A trick to starting the Tri-Z after it been left to sit for awhile is to blow into the vent tube that runs from the tank to the steering head. Just pull it out of the stem and blow really hard for a few seconds to purge all the air out of the system and fill the float bowl with fuel. They usually fire after one or two kicks once the carb has fuel in it.
You don’t want to kick that engine over any more than you have to. The kick lever and clutch cover are both known to break if abused and they are expensive and difficult to come by.
Hard to believe they would do that to the boost ports and not make any other changes. I hope you can put more photos up. If you end up needing a cylinder let me know.
It sucks to get old
-
Hey El Camexican, thats awesome thank you bro...ive been abit premature in getting her back together before really understanding these mods...u reakon i could slide the cylinder off, with the head on and it in the frame, then i could check correctly the distance between the top of the exhaust port and the head gasket...photos dont really show much

-
Based on the photo I don’t think anyone has touched the exhaust port.
I saw what appears to be weld, or epoxy in the photo you posted of the intake and assumed that if anyone was willing to rape that cylinder with a drill bit as as it appears they did, then they would have likely gone on to abuse it in other areas. Hopefully for your sake the stupidity started and ended with the boost port modification and that the cylinder was properly welded and decked after it broke.
Please do a pressure test on the engine to check the seals and gaskets for leaks before you start riding it. You’ll save yourself a pile of money and time if there’s a leak to be found.
It sucks to get old
-
If you did want to take the cylinder off for any other reason I think it can come off with with the head on it, but if not, and you’re worried about removing the head and losing the gasket, you may be able to remove it and re use it by just adding one more pound of torque to the nuts than you did the first time you installed it. Not recommend, but as long as the gasket is new and hasn’t been run more than a few minutes you should be able to cheat a bit. Unfortunately those engines have a reputation of leaking at the head gasket even in the best of circumstances, so keep an eye on it.
It sucks to get old
-
Thank you mate, yes i to think the cylinder may well come off with the head on...it has not been run since installing them. Weird of some people to do such a half ass job on the 2nd mod and not even complete the 1st lol
Shops are still shut here for walk-ins due to latest outbreak of covid but hopefully next week I can get the bits for a pressure test....i will definitely keep you posted with the results
Thanks again for your help m8
-
The exhaust port was probably spared because the only tool the guy had was a hand drill. If I had to bet he started off with a large bit and got in crooked. The correct way to do it unless you’re some sort of porting savant is to carefully drill a pilot hole with something no bigger than a 1/4” bit and then determine if you can open it straight through with a larger bit, or if you need to switch over to proper porting tools and correct any misalignment. I’ve done five of these and my arse still puckers up while drilling the pilot hole.
Not sure what your budget is for this, but if you do it right that trike should be worth a few bucks down the road.
If you didn’t already know, the single most valuable part on that trike is the clutch cover. Make sure all the dowels on the kick start assembly and clutch cover (2 for each) are installed and that there are no bolts missing. Nothing loose, but not over tightened either. There’s a spring clip on the starter worm gear that must be in good condition. They’re cheap, but if the wear and start to slip too easily your crack the clutch cover.
Search Tri-Z threads on this site if you have time, there’s lots of info on these trikes.
It sucks to get old
-
Cool i will check that out tomorrow, i didnt dig in as far as the spring clip on the starter when i did the crank seal so i will double check that..had to also free up the clutch then too, as sitting in the elements for all those years seized the thrust arm needle bearing and needed replacing.
i got the cylinder off a yes as you suspected no work on the exhaust port, im tempted to give to my m8 who owns a motor machinist shop who honed the bore for me as i only own a dremel and dont think i can get the right angle on the port edge with that. Option 2 is to buy a right angle die grinder but it will have to be tiny to get in the bore...decision decisions lol.
Looking again at the cylinder does suggest that yes a drill bit too big, too soon and not incrementing slowly enough on both holes was attempted and no competence present lol
Cheers m8......I'll be back... lol
-
It will probably cost $100+ bucks (and probably have it a month) for him to reshape the port and around $50 bucks for a die grinder for me to give it a go.... though not having done this before might just counter out the difference and i think being precise which im confident he will be, is a must imo
-
I’d suggest you leave that exhaust port alone for now, unless you’re planning on racing it. If you do decide to go it alone you’ll want to read up on shaping the top of the port and proper chamfering. If using a common 1/4” drive die grinder, you can raise that port from inside the cylinder, or by entering the exhaust port from the outside, but a typical 10,000 rpm grinder can be a handful and you could easily end up matching it to your boost ports.
Last edited by El Camexican; 09-02-2021 at 07:38 AM.
It sucks to get old
-
Roger that 
-
Kool, finally got a leak down tester and started the process but i cant for the life of me stop the reed valve from leaking. I've tried new gaskets and even smoothing all surfaces but dam thing refuses to seal. Maybe i will need to apply sum gasket goo or something similar?

//ArrowChat Integreation Code
//


 Reply With Quote