-
125m engine assembly question
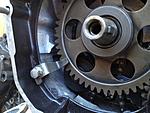
My question is about the 'driven gear set plate'. The manual shows where the plate goes but the picture is not clear enough to be obvious. The part was missing in this motor so I didn't get the benefit of disassembly. Does this look correct? and if so, what purpose does this part serve? It doesn't touch the gear itself nor does it seem to touch the flywheel when installed,,,,what am I missing here? the set plate is at about 8 o'clock in the photos.

-
So no one can answer this question? Or my question is not clear/too stupid to answer?? Any ideas on who is good with 125 motors that I can pm my question to?
-
Its saturday, maybe every one is out ridding. It seems like no one knows much about the 125's I might go buy one in a couple days. Ive posted a few threads about them and no one really said much.
-
You are right Trikester, there is never very much forum traffic on the 125. The parts I needed to finish assembly have arrived in the mail and I'm anxious to press on and get the motor completed and installed. Monday I will take another look at the set plate and try and figure out its purpose. And by the way, I enjoyed your post about all the adventures adventures with that first trike.
-
Thanks, ? Here's one I found for 100$ I Haven't had a chance to go look at it yet but it doesn't look so bad from here.  no fenders just what you see in the pic
Last edited by King Trikester; 09-29-2013 at 03:22 PM.
-
Whew....Alot of work to be done there Trikester! Did you say you wanted it for parts or to fix as a runner? Either way, I'd offer 50.00 for it. If it was me I'd feel good about getting it for 50.00 and use it as a parts bike. The recoil, subtrans, and left engine covers are parts I've spent about 150.00 buying each one separately on ebay and such. If you were to try and turn that one into a runner you are missing quite a bit, including tank and fenders, the air filter box top, wiring, electrical components like starter solenoid, choke cable, ignition, etc. Would take ALOT of work. Is the starter missing? Can't tell from that pic. Also the rack did not come on that model so it may have been welded on in a way that will require you to modify the fenders to make them fit. Wonder what kinda shape the recoil is in, and will the motor turn over. I made the mistake getting into this hobby of buying trikes that need ALOT of work to get them right...I'm okay with it because I'm learning and don't have to worry about messing up what wasn't an expensive purchase. Now that I'm gaining some experience and confidence, I will be more choosy on future purchases with the goal being to purchase in as complete of condition as possible. I enjoy actually LOOKING and shopping for parts, but the frustrating part is waiting on the parts to arrive. As of yet I've havn't found any local parts sources.
-
Decided to just wing it with a semi-informed guess. The manual pictures aren't very clear, but the order of placement is. I also moved the orientation of the part a bit too in the only way that makes sense looking at the part. There is sort of a "stop" tap on the part so when you install it you turn it until that little tab or projection stops against the crank case wall. Still have no idea what it does, but its in there where its supposed to be. I finished with the rest of the assembly except for the sub trans. Everything else went together pretty straightforward. Here's progress so far:

//ArrowChat Integreation Code
//


 Reply With Quote