Page 3 of 15 FirstFirst 1 2 3 4 5 13 ... LastLast
Results 31 to 45 of 224

Thread: 1984 ATC300R Fooler build

  1. #31
    nicker71's Avatar
    nicker71 is offline At The Back Of The Pack Arm chair racerAt the back of the pack
    Join Date
    Jun 2003
    Location
    Wright City, Missouri
    --
    385
    Sorry I don't mean to hi jack your post. But I just bought crank seals from ebay, I used the Dimensions to find some 38x62x10 and 28x50x7 double lip seals total was $13.52 shipped. This is basically what you get with the Boss bearing kit, they use the same cheap stuff as what I found here, I know this because I have their set in front of me. Notice they use 28x50x7 instead of the 28x50x8 as the Honda parts finch states. I just ordered a set and I will confirm these are exactly like the Boss kit.
    I found the Honda seals for both sides on ebay and it comes out to about $30 for the set. But their was only two listings for the LH side left on ebay.

    Thats a good looking tank, they are hard to find in decent shape. I used "Alvin Lab-Metal" as filler for the dents in my tank before I powder coated it and it worked alright.

    Here's my 84

  2. #32
    nicker71's Avatar
    nicker71 is offline At The Back Of The Pack Arm chair racerAt the back of the pack
    Join Date
    Jun 2003
    Location
    Wright City, Missouri
    --
    385
    I love the foolers, Keep us posted!!


  3. #33
    bigdaddyvw185's Avatar
    bigdaddyvw185 is offline At The Back Of The Pack Arm chair racerAt the back of the pack
    Join Date
    Mar 2013
    Location
    Seymour CT
    --
    314
    nice lookin fooler!, post up the link for the seals you got off of ebay, ima grab me a set actually post up the links you for all of the
    seals lol, honda ones included if it isnt too much trouble

  4. #34
    nicker71's Avatar
    nicker71 is offline At The Back Of The Pack Arm chair racerAt the back of the pack
    Join Date
    Jun 2003
    Location
    Wright City, Missouri
    --
    385
    Quote Originally Posted by bigdaddyvw185 View Post
    nice lookin fooler!, post up the link for the seals you got off of ebay, ima grab me a set actually post up the links you for all of the
    seals lol, honda ones included if it isnt too much trouble
    No problem, Here are the industrial oil seals
    http://www.ebay.com/itm/161111734222...84.m1423.l2649
    http://www.ebay.com/itm/161111767319...84.m1423.l2649

    Honda OEM seals
    http://www.ebay.com/itm/321237901887...84.m1423.l2649
    http://www.ebay.com/itm/370868076238...84.m1423.l2649

  5. #35
    bigdaddyvw185's Avatar
    bigdaddyvw185 is offline At The Back Of The Pack Arm chair racerAt the back of the pack
    Join Date
    Mar 2013
    Location
    Seymour CT
    --
    314
    thanks!, i made an offer on the larger honda oem seal http://www.ebay.com/itm/370868076238...84.m1423.l2649
    so lets see what happens with that, now as for the rest of the seals all of the rest seem to be available from
    rockymountainatvmc.com. they have these seals available,
    91202-HA2-771 OIL SEAL (28X50X8)
    91204-286-003 OIL SEAL (18X29X7)
    91207-ML3-003 OIL SEAL (28X40X8) (NOK)

    the only seals they dont have available are
    91203-430-005 OIL SEAL (38X62X10)
    91251-964-000 (replaces part #91206-329-000) DUST SEAL (16X22X3.2)

    now i no this may be a dumb question but are there any other seals needed besides the ones i have listed that i should
    pickup before i give my engine to the builder next week? because the less parts he has to buy the more money it will save
    me lol. id rather go out and buy all the seals i need for the bottom end then have him buy them because they are going to be more expensive if he has to buy them. the seals i listed are all the seals that are listed for the bottom end on rockymountainatvmc.com
    Last edited by bigdaddyvw185; 12-08-2013 at 03:45 PM.

  6. #36
    bigdaddyvw185's Avatar
    bigdaddyvw185 is offline At The Back Of The Pack Arm chair racerAt the back of the pack
    Join Date
    Mar 2013
    Location
    Seymour CT
    --
    314
    thats a nice looking engine you got there man, i was contemplating polishing my left side engine cover like yours is, but one
    thing that is holding me back on it was the fact that I thought it would be a pain to keep looking clean and shinny, how long
    have you had yours polished? do ya have to keep up on it alot? also what kind of exhaust do you have on your trike? the
    engine builder that is going to be doing my engine said that the DG setup i have is no doubt better than the stock setup but he also commented on if i can find a better exhaust to grab it.

  7. #37
    nicker71's Avatar
    nicker71 is offline At The Back Of The Pack Arm chair racerAt the back of the pack
    Join Date
    Jun 2003
    Location
    Wright City, Missouri
    --
    385
    Quote Originally Posted by bigdaddyvw185 View Post
    thats a nice looking engine you got there man, i was contemplating polishing my left side engine cover like yours is, but one
    thing that is holding me back on it was the fact that I thought it would be a pain to keep looking clean and shinny, how long
    have you had yours polished? do ya have to keep up on it alot? also what kind of exhaust do you have on your trike? the
    engine builder that is going to be doing my engine said that the DG setup i have is no doubt better than the stock setup but he also commented on if i can find a better exhaust to grab it.
    Thanks, It will probably dull rather quickly, but I don't plan on ridding it much. The polishing looks better in the picture than it actually is.
    It's a Bassani Exhaust system. Some of the air fooler guys talked highly of it as being a good old school exhaust. I had a dg exhaust and ran it before this one and I with my 250 jug and was pleased with it. The dg is the only one still available to buy new, but If you keep an eye on ebay you'll find a bassani and some others pop up from time to time.

  8. #38
    Join Date
    Apr 2010
    Location
    Indian Falls, NY
    --
    1,289
    Quote Originally Posted by bigdaddyvw185 View Post
    knocking would scare me a lil bit, especially considering that it "only had 10 hours on it" that would sketch me out....hopefully he didn't buy someone else's screw up and it works out for him.
    That's what I was saying, especially for what he got. He said the oil had some light metallic in it...either it's parts wearing in or he's got some serious issues. I'd think maybe parts wearing in with low hours like that, but I'm not sure. I told him to check the timing, and he said it was spot on to factory specs.

  9. #39
    barnett468 is offline FACT ! I have no edit button Arm chair racerThe day begins with 3WW
    Join Date
    Jan 2013
    Location
    minnesota
    --
    5,911
    91203-430-005 $20.00

    http://www.ebay.com/itm/S77-NOS-GENU...ht_1063wt_1214


    heres a nos oem supplier that has both, prices are english lbs.

    91203-430-005

    http://www.cmsnl.com/atc250r-1983-us...l_91203430003/


    91206-329-000

    http://www.cmsnl.com/products/91251-...l_91206329000/


    partzilla 91251-964-000 $3.90

    http://www.partzilla.com/parts/detai...1-964-000.html

  10. #40
    barnett468 is offline FACT ! I have no edit button Arm chair racerThe day begins with 3WW
    Join Date
    Jan 2013
    Location
    minnesota
    --
    5,911
    hi, don'y know where you are in your build or oif you are aware of the followig but you might be interested in the following thread.

    i would reliebve the ex port and drill holes in the front of the piston to reduce the chance of seizing on the ex side.

    http://www.3wheelerworld.com/showthr...-bored-85-250R

  11. #41
    bigdaddyvw185's Avatar
    bigdaddyvw185 is offline At The Back Of The Pack Arm chair racerAt the back of the pack
    Join Date
    Mar 2013
    Location
    Seymour CT
    --
    314
    i just got a bunch of seals order'd last night, here is a list of what i have order'd. all are oem honda seals.
    91202-HA2-771 OIL SEAL (28X50X8)
    91203-430-005 OIL SEAL (38X62X10)
    91204-286-003 OIL SEAL (18X29X7)
    91251-964-000 (replaces part #91206-329-000) DUST SEAL (16X22X3.2)
    91207-ML3-003 OIL SEAL (28X40X8) (NOK)

    now i think that is all of them, if i am missing one by all means please let it be known thanks for everyone's help!
    As for the thread you mentioned i was aware of such modifications, except i found the info from a different source, tho it is basically the same information. http://s.com/?page_id=749
    i am going to perform all of the mods in that article including the cylinder port work, i am having the engine built by ken O'Conner racing here in Ct, i sat down with him last weekend for about an hour discussing the engine. only difference from what i am going to do different from the article is not knife edge exhaust port. it will have a nice smooth curve instead. it was nice because right when i brought up the exhaust bridge in this cylinder to ken he new right off the bat about drilling the holes into the piston and releiving the exhaust port. he is going to give this cylinder a full port job front and back.

  12. #42
    barnett468 is offline FACT ! I have no edit button Arm chair racerThe day begins with 3WW
    Join Date
    Jan 2013
    Location
    minnesota
    --
    5,911
    Quote Originally Posted by bigdaddyvw185 View Post
    i just got a bunch of seals order'd last night, here is a list of what i have order'd. all are oem honda seals. now i think that is all of them, if i am missing one by all means please let it be known thanks for everyone's help!
    There might be an 0 ring on the countershaft but i didn't look.


    Quote Originally Posted by bigdaddyvw185 View Post
    i found the info from a different source, tho it is basically the same information. http://s.com/?page_id=749
    only difference from what i am going to do different from the article is not knife edge exhaust port. it will have a nice.
    Yeah, you likely don't really gain any much if any additional flow or reduce turbulence much by doing that mainly because the face of the bridge is flat so the air basically rams into it and blows off to the side and this side air obstructs some of the air from smoothly flowing out the port and because the tail of the bridge is so close to the face where the turbulent air is being created it may not have enough time to smooth out sufficiently for the shape of the tail to have much effect. This idea is a bit if a guess and no one knows for sure but one could run dyno tests to get an idea of what effects doing any of these changes might have. The prob is complicated by the fact that the ex gas is also trying to expand. A wind tunnel test of this would be fun to see, just need to pump some extremely hot air at it.

    Imagine the bridge as an airplane wing but both sides are convex instead of one being concave. If you narrowed and rounded the face [steel liner]to resemble the leading edge of an airplane wing the air would travel much more smoothly thru the port which means that more air could travel thru the port.

    When one relieves the ex bridge the ring no longer touches it. The primary purpose of the bridge is to keep the ring from expanding into the port and catching on the port. Once the bridge is relieved the only thing keeping the ring from catching is the transition from where it was relieved to where it returns to the size of the bore.

    This means that one could actually remove all but around the last 1/8" of an ex bridge on the top and bottom [including the aluminum portion in the port if one wanted] where the "relieved" portion transitions back to actual cyl size. One could also put a radius into the bridge then bull nose the whole thing.

    If I still worked at kawai i would do this [since all the parts were there and free] and dyno the cyls first and if it helped anywhere in the power band then ride the bike and let the pro mx guys try it just to see what it does.

    All our Kawi factory works cylinders had the ex ports polished to a mirror finish. Harry Klemm and Dave Miller did the same.

  13. #43
    C.J is offline Just Too Addicted Arm chair racerJust too addicted
    Join Date
    Apr 2011
    Location
    Central, Louisiana
    --
    639
    Quote Originally Posted by slashfan7964 View Post
    That's what I was saying, especially for what he got. He said the oil had some light metallic in it...either it's parts wearing in or he's got some serious issues. I'd think maybe parts wearing in with low hours like that, but I'm not sure. I told him to check the timing, and he said it was spot on to factory specs.
    Not trying to hijack BD,, but metalic looking paste in the oil is 90% of the time clutch material and if its "knocking" that is more than likely because most people hone an aircooled motor a little farther than a liquid cooled motor to allow for the "inefficient" heat dissipation. In other words the piston will be a hair too small for the actual bore size and you'll hear it rattle a little. OR it could be spark/heat knock cause from low octane/low quality fuel and/or premix. Lots of variables that could cause a fresh engine to "knock". You can always grab the flywheel and turn it back and forth just a few degrees really fast and if either of the rod bearings are out you will feel them tap through the crank.

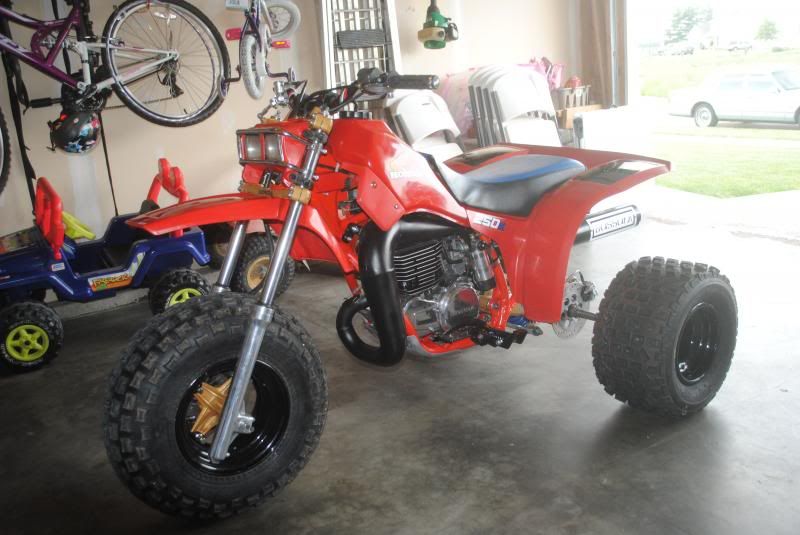
    Bigdaddy,,, I've been putting off reading the thread cause it seems like all threads that i read always end up not finishing so i was trying to give you some time LOL But its a reeeaaalllll sharp looking bike man!! You did a good job on polishing that silencer! You could probably get a decal made that looks just like the original DG decal but in the color that you want
    too many bikes to count. too little time on hand.

  14. #44
    bigdaddyvw185's Avatar
    bigdaddyvw185 is offline At The Back Of The Pack Arm chair racerAt the back of the pack
    Join Date
    Mar 2013
    Location
    Seymour CT
    --
    314
    I am with ya Barnett, the air plane with example was a good way to explain it. ill tell ya having modifications done to this cylinder stresses me lol, it cost be a boat load!, that is one of the main reasons why it is going to the builder to get all of the work done. i feel i am capable of doing the assembly of the engine but when i was told about that power player article from foolers.com i was not comfortable with doing the mods listed in that article. i wanted a builder to do the port work and give the entire engine a once over and assemble it so everything is fresh and at the top of its game. When i went up to talk to Ken (engine builder) last weekend i brought a printed copy of the power player article with me. he read threw it and was all for performing the modifications listed in the article and agreed it would be a good thing to do. but was totally against the knife edging that they described in the article. he was describing what you were describing with the air plane foil. he didnt use that terminology persay but it was the same principals.
    I have so much invested into this engine that i just want to get it to the best performing level it can comfortably, not looking to go race madness by any means. just want to make it perform and get the quirks out / fix the problem area's that could come up down the road. Ken was the solution to these stresses for me, he's been in business for 30 or so years, and from the looks of his shop made me more than comfortable with having him perform the work. I just couldnt bring myself to attempt any serious kind of mods to this cylinder Personally with me doing the mods.... as there is ZERO chance i am going to buy another one. lol.......

  15. #45
    bigdaddyvw185's Avatar
    bigdaddyvw185 is offline At The Back Of The Pack Arm chair racerAt the back of the pack
    Join Date
    Mar 2013
    Location
    Seymour CT
    --
    314
    since i am currently unemployed... I spent the day down at my best friends shop who is doing all the paint work for the trike, and assisted him with getting the tank all baby's bottom smoooooooth lol. tomorrow it will be going in for primer and last inspection before getting a full covering of red, then the tape goes on to edge out the black side pannel's. i think it is going to look pretty sweet when it all gets said and done which we are thinking will be by the end of the week. then for the seat i am going to get a 2 tone cover, Red in the middle then black on the sides, this is the seat cover i am going to get except the colors will be reversed.
    Click image for larger version. 

Name:	006.JPG 
Views:	19 
Size:	1.84 MB 
ID:	182142Click image for larger version. 

Name:	007.JPG 
Views:	21 
Size:	1.97 MB 
ID:	182143Click image for larger version. 

Name:	008.JPG 
Views:	14 
Size:	1.97 MB 
ID:	182144Click image for larger version. 

Name:	009.JPG 
Views:	13 
Size:	2.02 MB 
ID:	182145Click image for larger version. 

Name:	010.JPG 
Views:	10 
Size:	2.06 MB 
ID:	182146Click image for larger version. 

Name:	011.JPG 
Views:	7 
Size:	2.10 MB 
ID:	182147Click image for larger version. 

Name:	atc 250.JPG 
Views:	7 
Size:	15.7 KB 
ID:	182148

    My buddy brought up a good point, i am going to be horrified if i take a tumble on this trike and damage this tank once its finished, he made the suggestion of when i want to have it pretty put this tank on, then when i want to go on an extensive ride swap it out for the 2nd already dented up tank i have. which i thought was a great idea. it would be a tad bit of a hassle but one good roll over and this tank wont be so pretty.... so i see some tank swaps in this trikes future lol.

//ArrowChat Integreation Code //