
I see your exhaust assembly paste in the back ground.
Originally Posted by John_Neary


 Power User
Roostin Away
Power User
Roostin Away
I see your exhaust assembly paste in the back ground.
* 1978 ATC 90/180 Pauter PJ1 / Springer "Team BAPP" Bike *
* 1980 ATC 110/180 "Danny's Machine Works" 3D Sprint Dune Bike *
* Nicholson 500 Race Bike *
* HPATC Yamaha RD350 "Big Moe" Trike *
Got The Holeshot
Arm chair racerJust too addicted
I've made a chain slider for my CalFab out of Teflon. You can buy strips of it in different thicknesses and lengths from McMaster-Carr. Here is a picture of my Calfab followed by a link to where I bought the Teflon. Just type in "Teflon" in their search box and it should call it up.
http://www.mcmaster.com/
Last edited by christph; 08-18-2015 at 11:03 PM.
FACT ! I have no edit button
Arm chair racerThe day begins with 3WW
Ok, xlnt . . You can use basic unfilled Nylon 6 also known as MD Nylon . . Grainger and Mcmaster Carr have it as well as many other places, even Ebay and Amazon . . This should be a little harder than what you have . . The next step up is nylon 6/6 . . The site below will cut it to size . . The price is around $35.00 for 1 3/4 x 1/4 x 28 but they will give you any size and thickness you want . . It comes in white or black and is definitely much harder and more durable than what you have.
Another option is Nyulube . . It is made by Nylacast and is permanently self lubing and is harder than the Nylon 6/6 and is very cool stuff, however, I have never tried to heat and bend it so you can contact Erica and ask if 1/4 thick will make a 90 degree bend if you heat it with a heat gun . . She will also give you a price . . They might have to sell you more than you need but Im guessing it probably wont cost more than around $60.00 . . The natural color is dirty red as seen below . . It might be a bit overkill for your app . .
Buy custom size Nylon 6/6 here
http://www.polymerplastics.com/mechanical_nylon66.shtml
This is actually the Nylacast North America facility.
erica@Nylacastusa.com or just call her at 717-270-5600 ext 6
Mylube info
http://www.nylacast.com/semi-finishe...e#.VdPvYn3LDdU


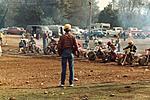
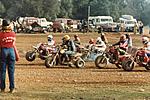
Local race in late 82, #74 is George's Honda 250 and #10 is our homemade Can Am.The other two riders are friends of ours, #55 is Danny Paiva and #18 is Matt Howard. George would spank us by half a lap but it was fun and we would have our own race over second place.

@Joseph - I also have the copper gasket now, gonna update the pipe sealant thread later with some pics showing how stuff fits.
@barnett468 - The chain slider is 17 inches long, 44mm wide and 3mm thick.
@chistph - yeah that just what i want, white or black would be fine
Doing some good work


The linkage has R for rear, F for Front and SH for shock so you do not mount it wrong...nice
Last edited by John_Neary; 08-18-2015 at 11:29 PM.
Power User
Got the holeshot
The swingarm chain buffer issue has been tackled before on this site by OC250r when he built his Frank's trike-
Maybe this will help, I would stick with the green look for nostalgic purposes.
http://www.3wheelerworld.com/showthr...ide-and-slider
Email- onformula1@hotmail.com Rebuilt, Revalved, custom springs, lowering, forks & shocks, Custom Suspension, all brands, 2-3-4 wheeler's- PM or Email with questions.
***Check out my album for cool pictures*** http://www.3wheelerworld.com/album.php?albumid=2527
As always- Everything I post is IMHO.
Thank you onformula1 for reminding me to keep it original as i can, the racer in me keeps emerging and wanting the best Best BEST! when i really am not doing any of this to make the bike to be ridden but to preserve it as it was.Interstate plastic sells 48x48 sheets of a nice color correct and durable plastic but i might just put the stock one back on since its not damaging the swing arm when the bike just sits around to be admired.
jeswinehart says he can help me but it will not be for a few months as he is booked up currently.The swing arm does not go back on in till the motor and shock are done so i am in no hurry so ill ask him again in a month or so what his time table is looking like.
Power User
Got the holeshot
I think OC250r Frank's have the green swingarm buffers and I think I remember him buying some material and making some???
He is not on here very much anymore, but you could PM him and he may respond at some point or someone on here may have his number or email address, it may be worth a shot.
Email- onformula1@hotmail.com Rebuilt, Revalved, custom springs, lowering, forks & shocks, Custom Suspension, all brands, 2-3-4 wheeler's- PM or Email with questions.
***Check out my album for cool pictures*** http://www.3wheelerworld.com/album.php?albumid=2527
As always- Everything I post is IMHO.
Pics from the Score World Championship in 81


Every kitchen needs a 3 wheeler muffler in the ovenpaste turned hard as a rock once it was warmed up

Ready to go back on

Power User
Got the holeshot
Interesting, I have never used the paste on a silencer before, I wrap two bands of blue masking tape around both silencer ends with a 1/4" gap and put a smooth bead of 100% clear silicone down then remove the masking tape, you end up with a clean silicone band that can be removed easily with a plastic razor blade.
Please keep us updated with the results.
I also didn't know Mr. Franks used SAE bolts on the swingarm instead of Metric, I guess I have never seen such great pictures of a Franks before to have noticed.
Thanks
Last edited by onformula1; 08-21-2015 at 12:08 AM.
Email- onformula1@hotmail.com Rebuilt, Revalved, custom springs, lowering, forks & shocks, Custom Suspension, all brands, 2-3-4 wheeler's- PM or Email with questions.
***Check out my album for cool pictures*** http://www.3wheelerworld.com/album.php?albumid=2527
As always- Everything I post is IMHO.
Nicholson 200 in 82


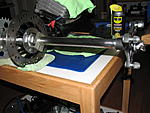
Axle is one of the few things i had to use some muscle on but it had scratches from the metal rear stand we used that i was not happy about.It was either shiny or beat up and scratched so shiny won out.
Also a shot of the other side of the swing arm.

Gonna take the cylinder, clutch cover and ignition cover off later today so gotta clear off my work bench as the engine is gonna be taking up most of it for at least week while i figure out what parts, gaskets and o-rings it needs. Once the engine is sorted that just leaves the forks, shock and tires to deal with.
Power User
The day begins with 3WW
Sooo beautiful. What a great piece of racing history.
Please help those who cannot help themselves.
ALWAYS buying Museum quality machines,3 and 4 wheels. And any and ALL ,NOS parts,EVERY brand.
I am turning my PM's Off,my Email is billsracing@hotmail.com,put 3WW in the subject. Thanx!
Gun laws do not stop criminals. BULLETS do.
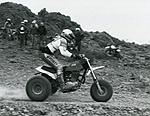
First pic is from the invitational race in Alaska, on the line is Jimmy White, Dean Sundahl and Wax. George said the local guy on the Yz250 powered bike jumped the start of every single race he was in all weekend long. Second photo is George on his XR500 at the Mint 400 in 82.Notice in the shot of George jumping the KTM495 at Saddleback it has no front brake...gotta be brave or stupid to ride that bike with just a rear brake.

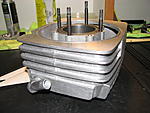
Getting into the Rotax engine.
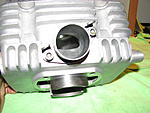
Cylinder cleaned up nice and just needs a hone but the sleeve is an issue. If you look close at photo #3 the slots for the cylinder studs are over sized and the far one has been ground clear through so that the o-ring groove has been compromised. This is causing a air leak and that is likely why the bike blew out the radiator hose spigot due to the extra pressure from the leak. Not sure yet what i am gonna do about it.

I am amazed at how small the exhaust and transfer ports are for a 250cc engine, between that and the weird sleeve i bet this thing started out life at a much smaller displacement. The 74mm bore and 54.5mm stroke (i could be off on this number) will never gonna give a proper offroad powerband.


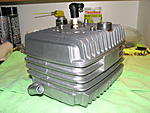
Got the clutch cover off and everything looks good. The ignition cover is being fussy and since its made of magnesium i am afraid to get very physical with it. Trouble with gluing these cases together instead of using a gasket.


Last edited by John_Neary; 08-23-2015 at 04:41 PM. Reason: added a few more pics
Power User
Got the holeshot
Was the o-ring distorted by that head stud?
With that stroke you are in the 125cc range, many Honda CR125's were 54mm X 54.5mm
It could have been a oversquare 175cc or 200cc engine and Rotax had all those sizes of engines.
With your current 4mm bore and 54.5mm stroke you are at 234cc so it's not a 250 per say.
Do you know who built that engine? I am not sure, but I didn't think Mr. Frank's did engine work like that.
Email- onformula1@hotmail.com Rebuilt, Revalved, custom springs, lowering, forks & shocks, Custom Suspension, all brands, 2-3-4 wheeler's- PM or Email with questions.
***Check out my album for cool pictures*** http://www.3wheelerworld.com/album.php?albumid=2527
As always- Everything I post is IMHO.
Power User
Got the holeshot
Here's a bunch of Rotax engine specs. I see 54mm strokes, but no 54.5mm
http://www.classiccanam.com/canam6.htm
Sure the stroke is not 57.5mm? Then it would be 247cc which Rotax used in the 250 engines.
Email- onformula1@hotmail.com Rebuilt, Revalved, custom springs, lowering, forks & shocks, Custom Suspension, all brands, 2-3-4 wheeler's- PM or Email with questions.
***Check out my album for cool pictures*** http://www.3wheelerworld.com/album.php?albumid=2527
As always- Everything I post is IMHO.
That stroke length was just off the top of my head so i could very much so be off a bit on it, but it is way over square all the same. Tony Murphy is sure he sold the parts to make these engines to Kelvin and i need to call him next week to check on gaskets and o-rings that i am sure i need at this point so ill ask about who put these engines together. Someone has ported it but did not do a great job in my opinion.
Yes the head o-ring had blown out
Easy fix would be to dab some JBweld into the hole to fill the gap, or send it off and have the sleeve removed and the stud slots welded up and ground out by hand. More i look at this engine the more i wanna get it in the hands of someone more skilled and equipped than myself and have it done correctly. Wonder if Mike at VintageMotorsport wants another Rotax project as i really like the work they did for OC250R.
Oh and this engine is not on that chart as it did not start out as a Can Am, far as i know the lower end is from Rotax's road racing department and the cylinder and head was meant for a go kart.


 Reply With Quote