
if you are not having to counter steer you are going to slow


if you are not having to counter steer you are going to slow
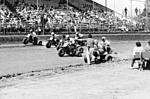
little on track action for your Friday


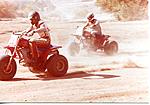
couple Rotax shots from today
the dark spots around the footpegs is the most stubborn dirt i can remember, been scrubbing and scrubbing but so far it is not impressed by my efforts

saw this dent in the frame for the first time today when i turned it over, about brought a tear to my eye..and i have not a clue what the heck i hit to of done it..bad 1984 John, bad
any advice on how to get this bearing off the bottom clamp? i wanna replace it but with the aluminum stem i do not think heating the bearing would have its normal result

Last edited by John_Neary; 08-28-2015 at 08:04 PM. Reason: added a few more pics
Power User
Got the holeshot
The frame looks like you cased it, I have done that a few times on MX bikes with out a skid plate or glide plate, they can be removed.
On the stem just jig it up and press the stem down until the bearing comes off, soak it with KROIL or other for a few hour before. It will take a bit off pressure then it will "pop" then it will come right off.
Heating it will make it worst.
Sent from my SM-G386T1 using Tapatalk
Email- onformula1@hotmail.com Rebuilt, Revalved, custom springs, lowering, forks & shocks, Custom Suspension, all brands, 2-3-4 wheeler's- PM or Email with questions.
***Check out my album for cool pictures*** http://www.3wheelerworld.com/album.php?albumid=2527
As always- Everything I post is IMHO.
Couple XR500 and a out of focus KTM495

Ordered all the gaskets and o-rings yesterday for the Rotax, only came to $76 with tax and shipping...was expecting it to be twice that for all NOS stuff. Thank you again for sending me to Tony Murphy as that has worked out awesome. He even found me a stash of new Wisco reproductions of my piston and ring that Al Roberts in Texas has in stock.
Decided to fix the sleeve with JBweld, should work fine since its not on the compression side and just needs to be there to keep the o-ring in place.
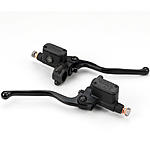
Starting to sort out the controls, going with a Grimeca front master cylinder but still shopping around for the best price.
Think i am gonna use these plain black steel bars as my Sundahl bars need to be bead blasted because of rust pitting and anything i do to them just removes the gold surfacing.

Power User
Got the holeshot
Congrats on the piston, the Grimecas are cool nostalgic master cylinders, I wish they stopped and were not as mushy as the modern stuff, that looks like a Magura clutch lever are those Domino grips?
Sent from my SM-G386T1 using Tapatalk
Email- onformula1@hotmail.com Rebuilt, Revalved, custom springs, lowering, forks & shocks, Custom Suspension, all brands, 2-3-4 wheeler's- PM or Email with questions.
***Check out my album for cool pictures*** http://www.3wheelerworld.com/album.php?albumid=2527
As always- Everything I post is IMHO.
Yeah new Magura clutch perch because the one that was on the Rotax was a Magura front brake so it was facing upside down and that bugged me and it had a lot of play from use so it got shelved. I like this style of grip because they clear the clutch lever when it is pulled in better then full donut type grips do.
This is the brake i would get if i could afford it but with shipping it is $500.00 so yeah that is not happening.
My current task while i wait for engine stuffs. Trying to track down who has parts for the older 1980s style Ohlins shocks and does service on them but no luck so far. Really wanna get this shock taken apart so i can find out if it has a travel limiter inside or does it use a short shock shaft, if it has a limiter i can have it removed the return the bike to its normal full travel setup that i prefer the look of. At the least i want the spring given a fresh yellow powder coat.

Power User
Got the holeshot
Those grips were comfortable and no blisters, that Brembo is cool looking, I remember them but they were before my time by a couple of years, so I never rode with one
Sent from my SM-G386T1 using Tapatalk
Email- onformula1@hotmail.com Rebuilt, Revalved, custom springs, lowering, forks & shocks, Custom Suspension, all brands, 2-3-4 wheeler's- PM or Email with questions.
***Check out my album for cool pictures*** http://www.3wheelerworld.com/album.php?albumid=2527
As always- Everything I post is IMHO.
FACT ! I have no edit button
Arm chair racerThe day begins with 3WW
.
ohlins shock reuilders in sonoma phone 707-938-5664
http://performanceshock.com/index.ph...roducts_id=228
or try
http://www.racetech.com/
.
Power User
Got the holeshot
John, I sent you a PM
Sent from my SM-G386T1 using Tapatalk
Email- onformula1@hotmail.com Rebuilt, Revalved, custom springs, lowering, forks & shocks, Custom Suspension, all brands, 2-3-4 wheeler's- PM or Email with questions.
***Check out my album for cool pictures*** http://www.3wheelerworld.com/album.php?albumid=2527
As always- Everything I post is IMHO.
The world was a better place when men lined up every weekend to race their Tri-Motos.

@barrnet468 - Thank you, I sent Racetech and OhlinsUSA email's yesterday. But i am gonna have onformula1 work on it as he has offered to help and as it just needs to be torn down and inspected for stuff gone awry from age and checked to see if he can return it to the full motocross suspension height by removing a down travel limiter i suspect is under the piston so it should not be a major chore.
At The Back Of The Pack
Arm chair racerAt the back of the pack
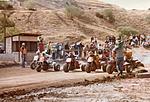
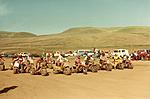
Great pics again, where are those last three shots from?
Looks like every person racing has custom mods. So cool
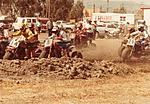
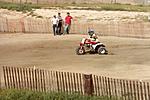
@phantomtracer - First pic is from Carnegie OHV park in late 81, center pic is a local race at Indian Dunes early 82 and the third pic is my local track, CycleLand Speedway, mid 82.
#17 on the Tri Moto is my friend Bobby, he was a exc at Maier who got sick of company life so he moved to Chico and opened up a ATV hopup shop called "Backwoods Racing" or some such, the yellow jersey you see me wearing in a lot of these shots on my 200 Nicholson is his shop's logo. He was a super, super nice guy and from what i heard was a national caliber woods rider on a dirt bike and raced the Blackwater a few times but i never got to ride dirt bikes with him.
Some Rotax before it was a pile of parts on my bench
*for onformula1*
I want to mount the reservoir where it is in these photos but with the hose coming directly to it from the shock instead of wrapping around like it does now.


Last edited by John_Neary; 08-29-2015 at 09:46 PM.
Power User
Got the holeshot
^ That would look a lot cleaner, plus those reservoirs hold only 10% of the total length in fluid which is not a lot, so cooling is not a huge issue.
I may work better to have the banjo bolt clocked the opposite way toward the reservoir too.
Email- onformula1@hotmail.com Rebuilt, Revalved, custom springs, lowering, forks & shocks, Custom Suspension, all brands, 2-3-4 wheeler's- PM or Email with questions.
***Check out my album for cool pictures*** http://www.3wheelerworld.com/album.php?albumid=2527
As always- Everything I post is IMHO.
Power User
Got the holeshot
John across the bottom of the spring I see purple paint lines and blue paint lines, but that is all I can see there should be another set of paint lines more than likely two more blue or two more purple. (They maybe chipped off)
Are they still there?
Email- onformula1@hotmail.com Rebuilt, Revalved, custom springs, lowering, forks & shocks, Custom Suspension, all brands, 2-3-4 wheeler's- PM or Email with questions.
***Check out my album for cool pictures*** http://www.3wheelerworld.com/album.php?albumid=2527
As always- Everything I post is IMHO.
It is has four purple and two blue, can just barely see the paint left of two of the lines.


 Reply With Quote