Page 1 of 2 1 2 LastLast
Results 1 to 15 of 19

Thread: How-to-guide to painting plastics: PICS ADDED

  1. #1
    300rman's Avatar
    300rman is offline My other user 3WW ID was Nitebiker07. Teaching quads a lesson
    Join Date
    Nov 2007
    Location
    toledo
    --
    2,667

    How-to-guide to painting plastics: PICS ADDED

    Okay, so, as many of you know, i painted the plastics on my R. I didnt want to post the specifics on it in case it didnt hold up, but so far it is holding up outstandingly well. time to share.


    1. Wash and dry plastics.

    2. wipe down with Wax and Grease Remover, making sure to wipe dry. DO NOT LET IT DRY BY ITSELF, as this will defeat the purpose. repeat this process to be sure the surface is oil and wax free.

    3. Sand the plastics with 80 grit paper until the entire surface getting painted is nasty rough. this gives the paint something to grip.

    4. Ok, now we will coat the surface with Bulldog Adhesion Promoter. Coat the plastics twice to ensure good coverage.

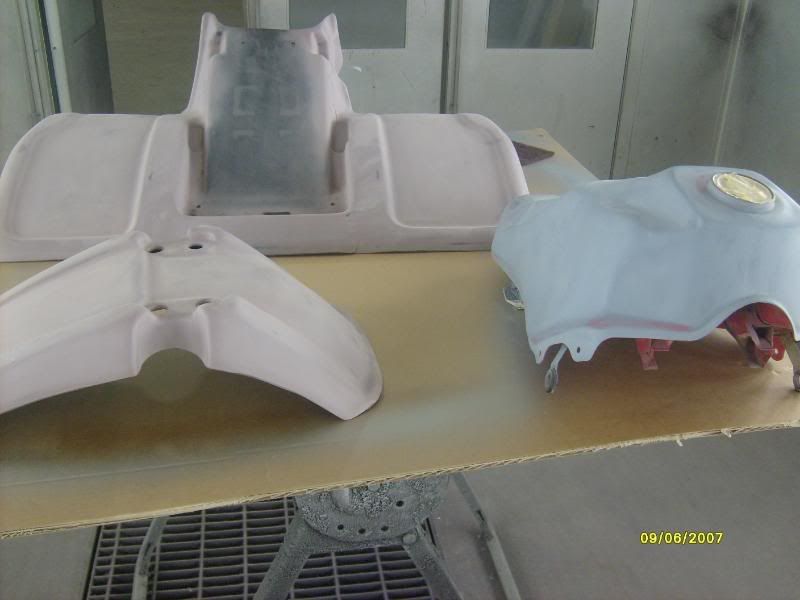
    5. Now, we will coat the plastics in transtar rose primer. for a front fender and rear fender on a 250R, it will take about 2 1/2 cans to do this step properly.
    What we want to do is lay 2 heavy coats on and let dry. outside in the sun, this stuff dries to a sandable finish fast.
    after it has dried, you will take 150 grit paper and a foam sanding block and sand the primer. Sand to make smooth, BUT if you start to see the adhesion promoter, DONT SAND that area any more.
    Coat them again with the transtar primer and sand with 150 grit until the 80 grit sanding scratches are gone, and it is as smooth as you desire.

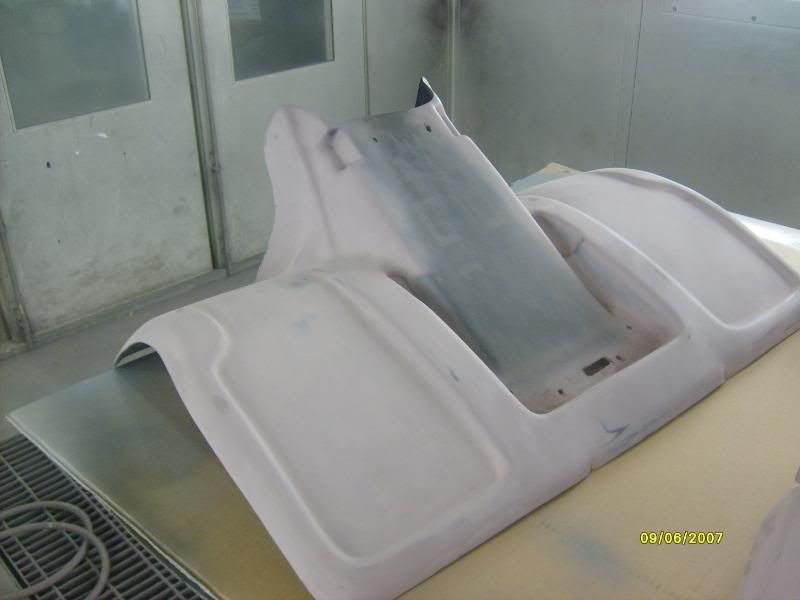
    6. now you will coat the plastics again with the transtar primer. but this time, when it dries, lightly block it out with 360 grit paper until the whole surface has been sanded smooth. this will make the top-coat smooth as glass if done properly.

    7. After all sanding with the 360 is done, you will now scuff the plastic surface with a RED (i believe it is a FINE) scuff pad. this helps to further smooth and ensure good top-coat adhesion.

    8. Now that all sanding is done, use an air blower and thoroughly blow all the dust off the pieces being painted, from both the top and underside. this makes sure residual dust doesnt end up in the paint....after all, we DO NOT want a dirt-free paint job. (dirt's free, we didnt charge a dime!)
    It is wise to use the Wax and Grease remover again to remove all dust and any possible oil that may have gotten onto the finish.

    9. Now, wipe all surfaces with a Tack-Cloth. . dont press real hard with it or let it set on the surface too long, it will leave a sticky residue, making the paint job look crappy. just lightly and quickly wipe them down right before painting.

    10. this step is all you. Paint with whatever you want. s, airbrush art, whatever. paint as you would anything else.

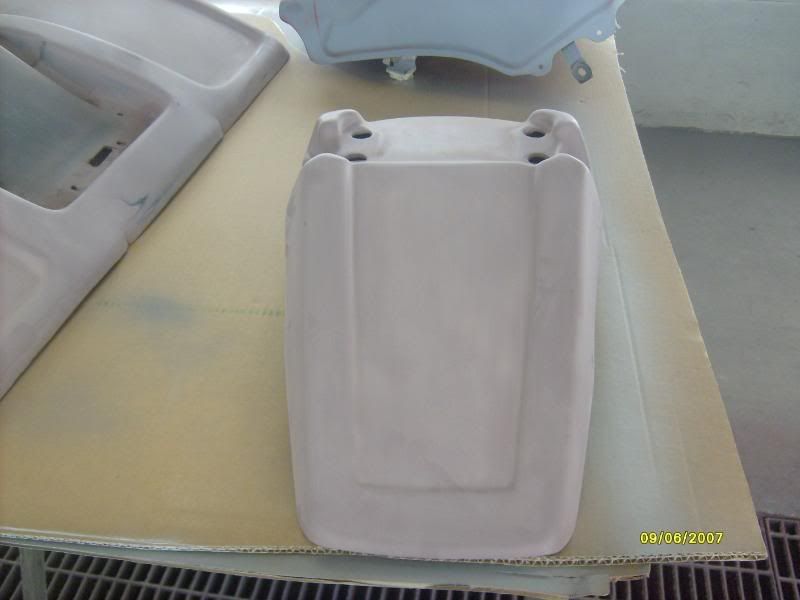
    11. ok, for small items, such as headlight shrouds and such, i have found that just sanding with 360 grit and then using the scuffpad, then the adhesion promoter and then painting will provide adequate adhesion.


    using the above method, if done properly, the finish will be as smooth as any show-car's, and will hold up quite well. best bet is to make up a rear fender brace to keep the rear "wings" from flapping. this will cause accelerated paint wear.

    DONT powerwash the painted surface, it WILL blow paint off in due time.
    when you start to get it chipped up, use superglue in the chipped areas to keep the edges of the paint from peeling away from the plastic. it works great!

    This method holds up quite well, and has held up on my bike for over a year, and yes, it has a few chips and cracks, but i ride my machine quite a bit.
    If, however building more of a "show bike" then this method is the ONLY way to go.


    AND for you cheap-o people, KRYLON FUSION is your friend. this can be sprayed directly over the plastic, just make sure the plastic is CLEAN and oil/wax free. a little scuffpad action is also very good.


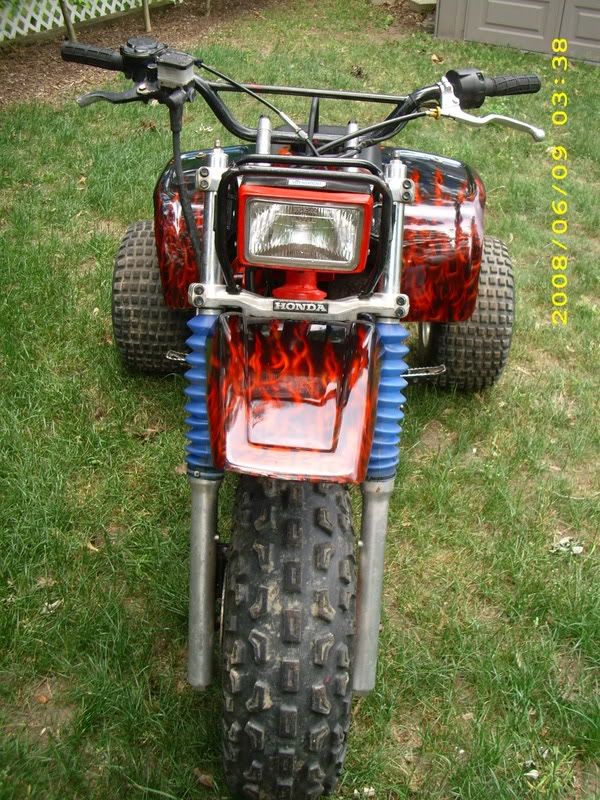
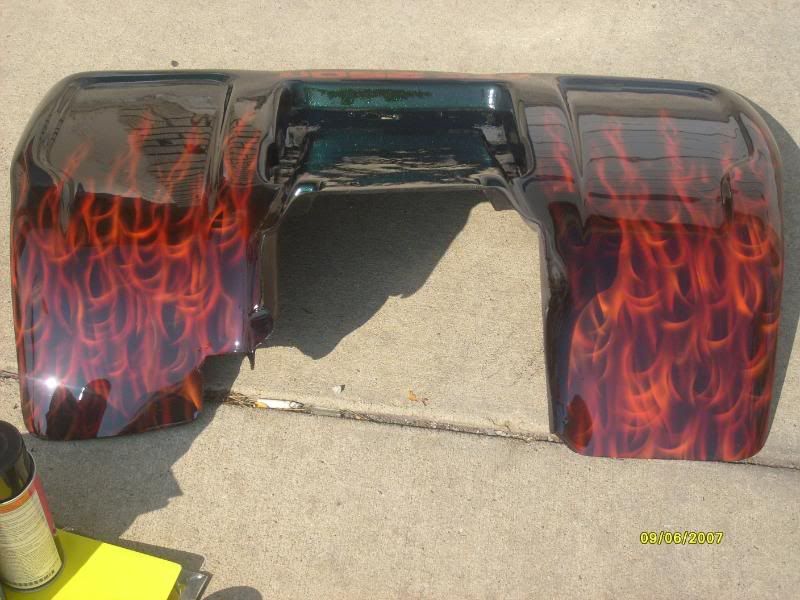
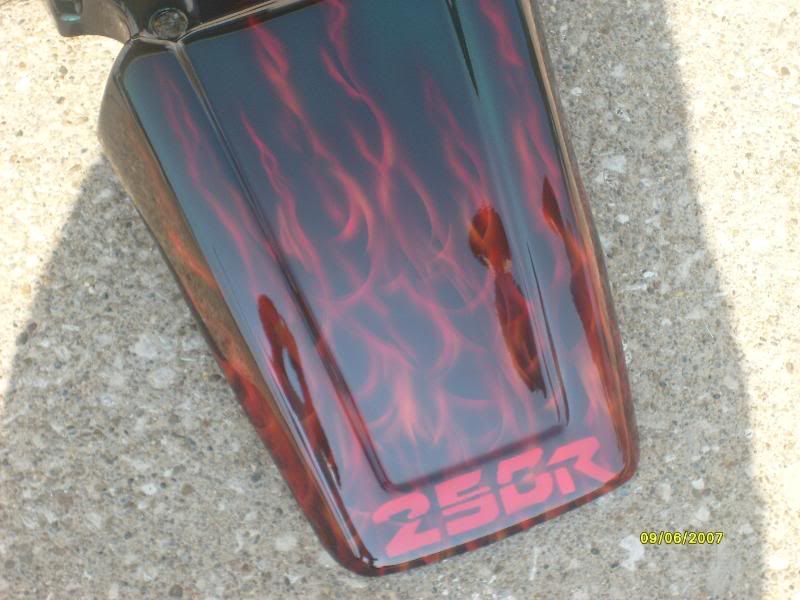
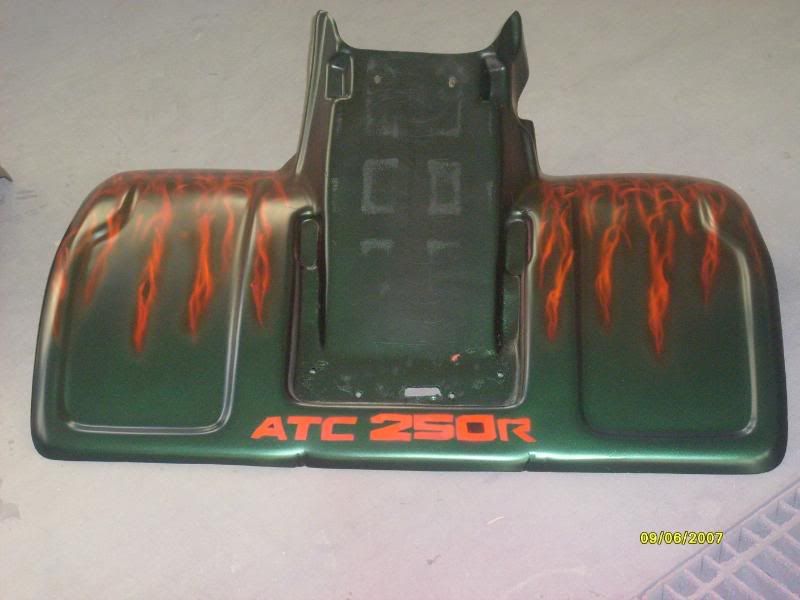
    oops i never added pics of the finished product....


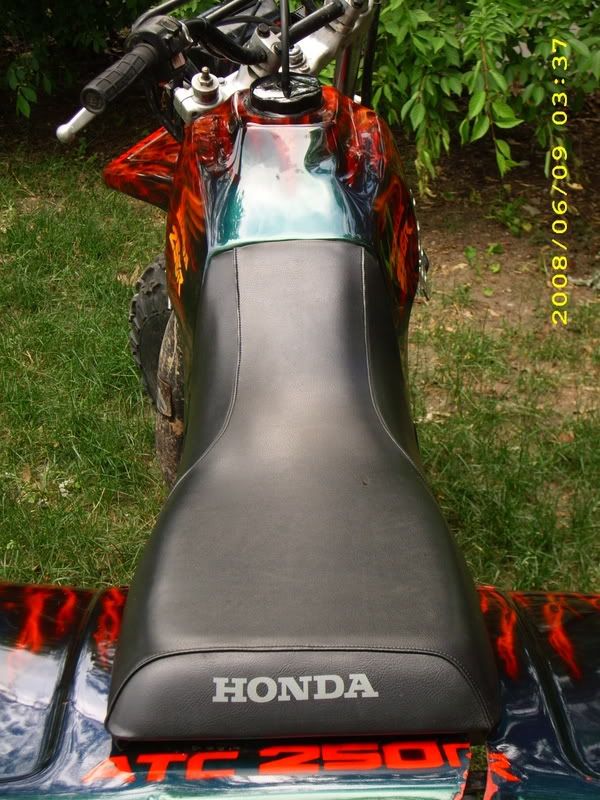
    and here is the bike all together

    Last edited by 300rman; 09-22-2009 at 12:35 AM.

  2. #2
    300rman's Avatar
    300rman is offline My other user 3WW ID was Nitebiker07. Teaching quads a lesson
    Join Date
    Nov 2007
    Location
    toledo
    --
    2,667
    Bump, been getting a few requests for links, figured some newbies would enjoy reading.

  3. #3
    Join Date
    Aug 2008
    Location
    Internet
    --
    1,251
    That paint job is s-i-c-k! Thanks for the guide and links to products used. Bookmarked this one for future reference!

  4. #4
    Join Date
    Jun 2008
    Location
    NE Indiana
    --
    1,067
    hell, yeah!

  5. #5
    Join Date
    Apr 2008
    Location
    somerset ma
    --
    1,822
    That thing looks super nice, awesome job for sure
    My rides, 1985 ATC 350X, With legit Lamborghini Countach paint,2003 Harley Davidson FXDL Dyna Low Rider,customised the way I like it! 1997 GMC Sierra is gone, primary mode of transportation, 2008 Toyota Yaris!

    Check out my build thread of my 350X
    http://www.3wheelerworld.com/showthread.php?95389-Tank-s-1985-350X-build-is-FINALLY-all-done!-)
    Screw giving away the Harley, It's payed for!!

  6. #6
    300rman's Avatar
    300rman is offline My other user 3WW ID was Nitebiker07. Teaching quads a lesson
    Join Date
    Nov 2007
    Location
    toledo
    --
    2,667
    Bump! we need a how-to section.

    paint is still in pretty good shape. it isnt perfect, but by now, i cant imagine new plastics would look too great either, after what i have put the bike through.

    if you want a shiny garage queen bike, this method is PERFECT. the plastics look like a top-dollar paintjob you would see on a car in a magazine.


    i have bounced off of a few trees, rolled it a few times, and the paint hasent "flown off"

    wherever it starts to crack, superglue it down, and around edges of cracks/chips. it keeps it from getting worse.

  7. #7
    Join Date
    Mar 2007
    Location
    Howard Beach, New York, United States
    --
    687
    why isnt this stickyd, i think i may just go the whole nine yards with my plastics thanks to this, about how much did supplies cost you?
    Current Project:1978 Pontiac Phoenix 355 v8
    Past Bikes: 1999 Yamaha Big bear 350, 1981 Yamaha XS 400, 1996 Yamaha yz250 1984 Honda big red, 2004 Xtreme cr107, 1999 Yamaha bear tracker, 1999 Suzuki ds80 STOLEN, 2005 Kawasaki klx110, 1986 Honda trx200sx
    Daily Driver: 1990 Buick Electra Park Avenue 3.8 v6

  8. #8
    300rman's Avatar
    300rman is offline My other user 3WW ID was Nitebiker07. Teaching quads a lesson
    Join Date
    Nov 2007
    Location
    toledo
    --
    2,667
    Quote Originally Posted by honda_atc200es View Post
    why isnt this stickyd, i think i may just go the whole nine yards with my plastics thanks to this, about how much did supplies cost you?
    the supplies i used are highlighted in BLUE in the article, and if you click on them, it will take you to a website that sells them.

    i got the basecoat and clear for free though, and those are NOT cheap unless you have a painter buddy that can get you some.
    painted using Automotive paint.

    an enamel could be used over the prepwork, and would turn out good, but auto paint has no equal.

  9. #9
    Join Date
    Dec 2005
    Location
    USA
    --
    71
    So if you went the cheap route and used the Krylon Fusion, what steps would you take to prep the plastic?

  10. #10
    Join Date
    Feb 2004
    Location
    Tionesta, PA
    --
    5,743
    Quote Originally Posted by RoadRacer 831 View Post
    So if you went the cheap route and used the Krylon Fusion, what steps would you take to prep the plastic?
    LOL - spray can techniques are worlds different in prep and final result than qutomotive style prep and paint - LOL.

    I have to ask a question about this thread - Your paint looks great - really awesome - so I gotta ask - why in the world did you not fix the big honking dent in the tank before you did this paint work? Seems kinda silly to me.
    RIP - Yamahondaman!! You will never be forgotten!
    RIP - Sam Brehm!! Gone but NEVER forgotten!
    RIP - Sandpuppi101 - You will live on in my mind - I miss you friend!

  11. #11
    250rulzes is offline At The Back Of The Pack Arm chair racerFirst time rider
    Join Date
    Aug 2004
    Location
    TEXAS
    --
    228
    I want that spray booth...

  12. #12
    300rman's Avatar
    300rman is offline My other user 3WW ID was Nitebiker07. Teaching quads a lesson
    Join Date
    Nov 2007
    Location
    toledo
    --
    2,667
    Quote Originally Posted by atctim View Post
    LOL - spray can techniques are worlds different in prep and final result than qutomotive style prep and paint - LOL.

    I have to ask a question about this thread - Your paint looks great - really awesome - so I gotta ask - why in the world did you not fix the big honking dent in the tank before you did this paint work? Seems kinda silly to me.

    because i had a half-day to get everything ready to paint. if it wasnt ready RIGHT NOW, it wasnt getting painted for a few months.

    In person, the dents arent as eye-grabbing. the camera reflects alot of light in them, and makes them stand out in the pictures.

  13. #13
    300rman's Avatar
    300rman is offline My other user 3WW ID was Nitebiker07. Teaching quads a lesson
    Join Date
    Nov 2007
    Location
    toledo
    --
    2,667
    Quote Originally Posted by RoadRacer 831 View Post
    So if you went the cheap route and used the Krylon Fusion, what steps would you take to prep the plastic?

    i covered that in the How-TO towards the bottom. Scuff with scuffpad, and wax+grease remover to clean, then spray with your fusion.

  14. #14
    RudeDog666 is offline At The Back Of The Pack Arm chair racerFirst time rider
    Join Date
    Sep 2009
    Location
    Frozen Tundra
    --
    164
    I recently got my first 2 trikes that need attention and this will help me out immensely. Thanks!

  15. #15
    300rman's Avatar
    300rman is offline My other user 3WW ID was Nitebiker07. Teaching quads a lesson
    Join Date
    Nov 2007
    Location
    toledo
    --
    2,667
    Bumping again. Found my old 3 wheeler a while back...keep the pressure washer away from the paint, it will hold up pretty good. The guy blew all the paint off the rear fenders with a pressure washer Doing a process like I did would be infinitely better for a bike that sees mainly Dune use.

    Someone should put this into the world-class help forum so people have better access to it

//ArrowChat Integreation Code //